Author: Sherryl Andria

Lotus Leaf Buns (steamed with sweet coconut-jaggery filling)

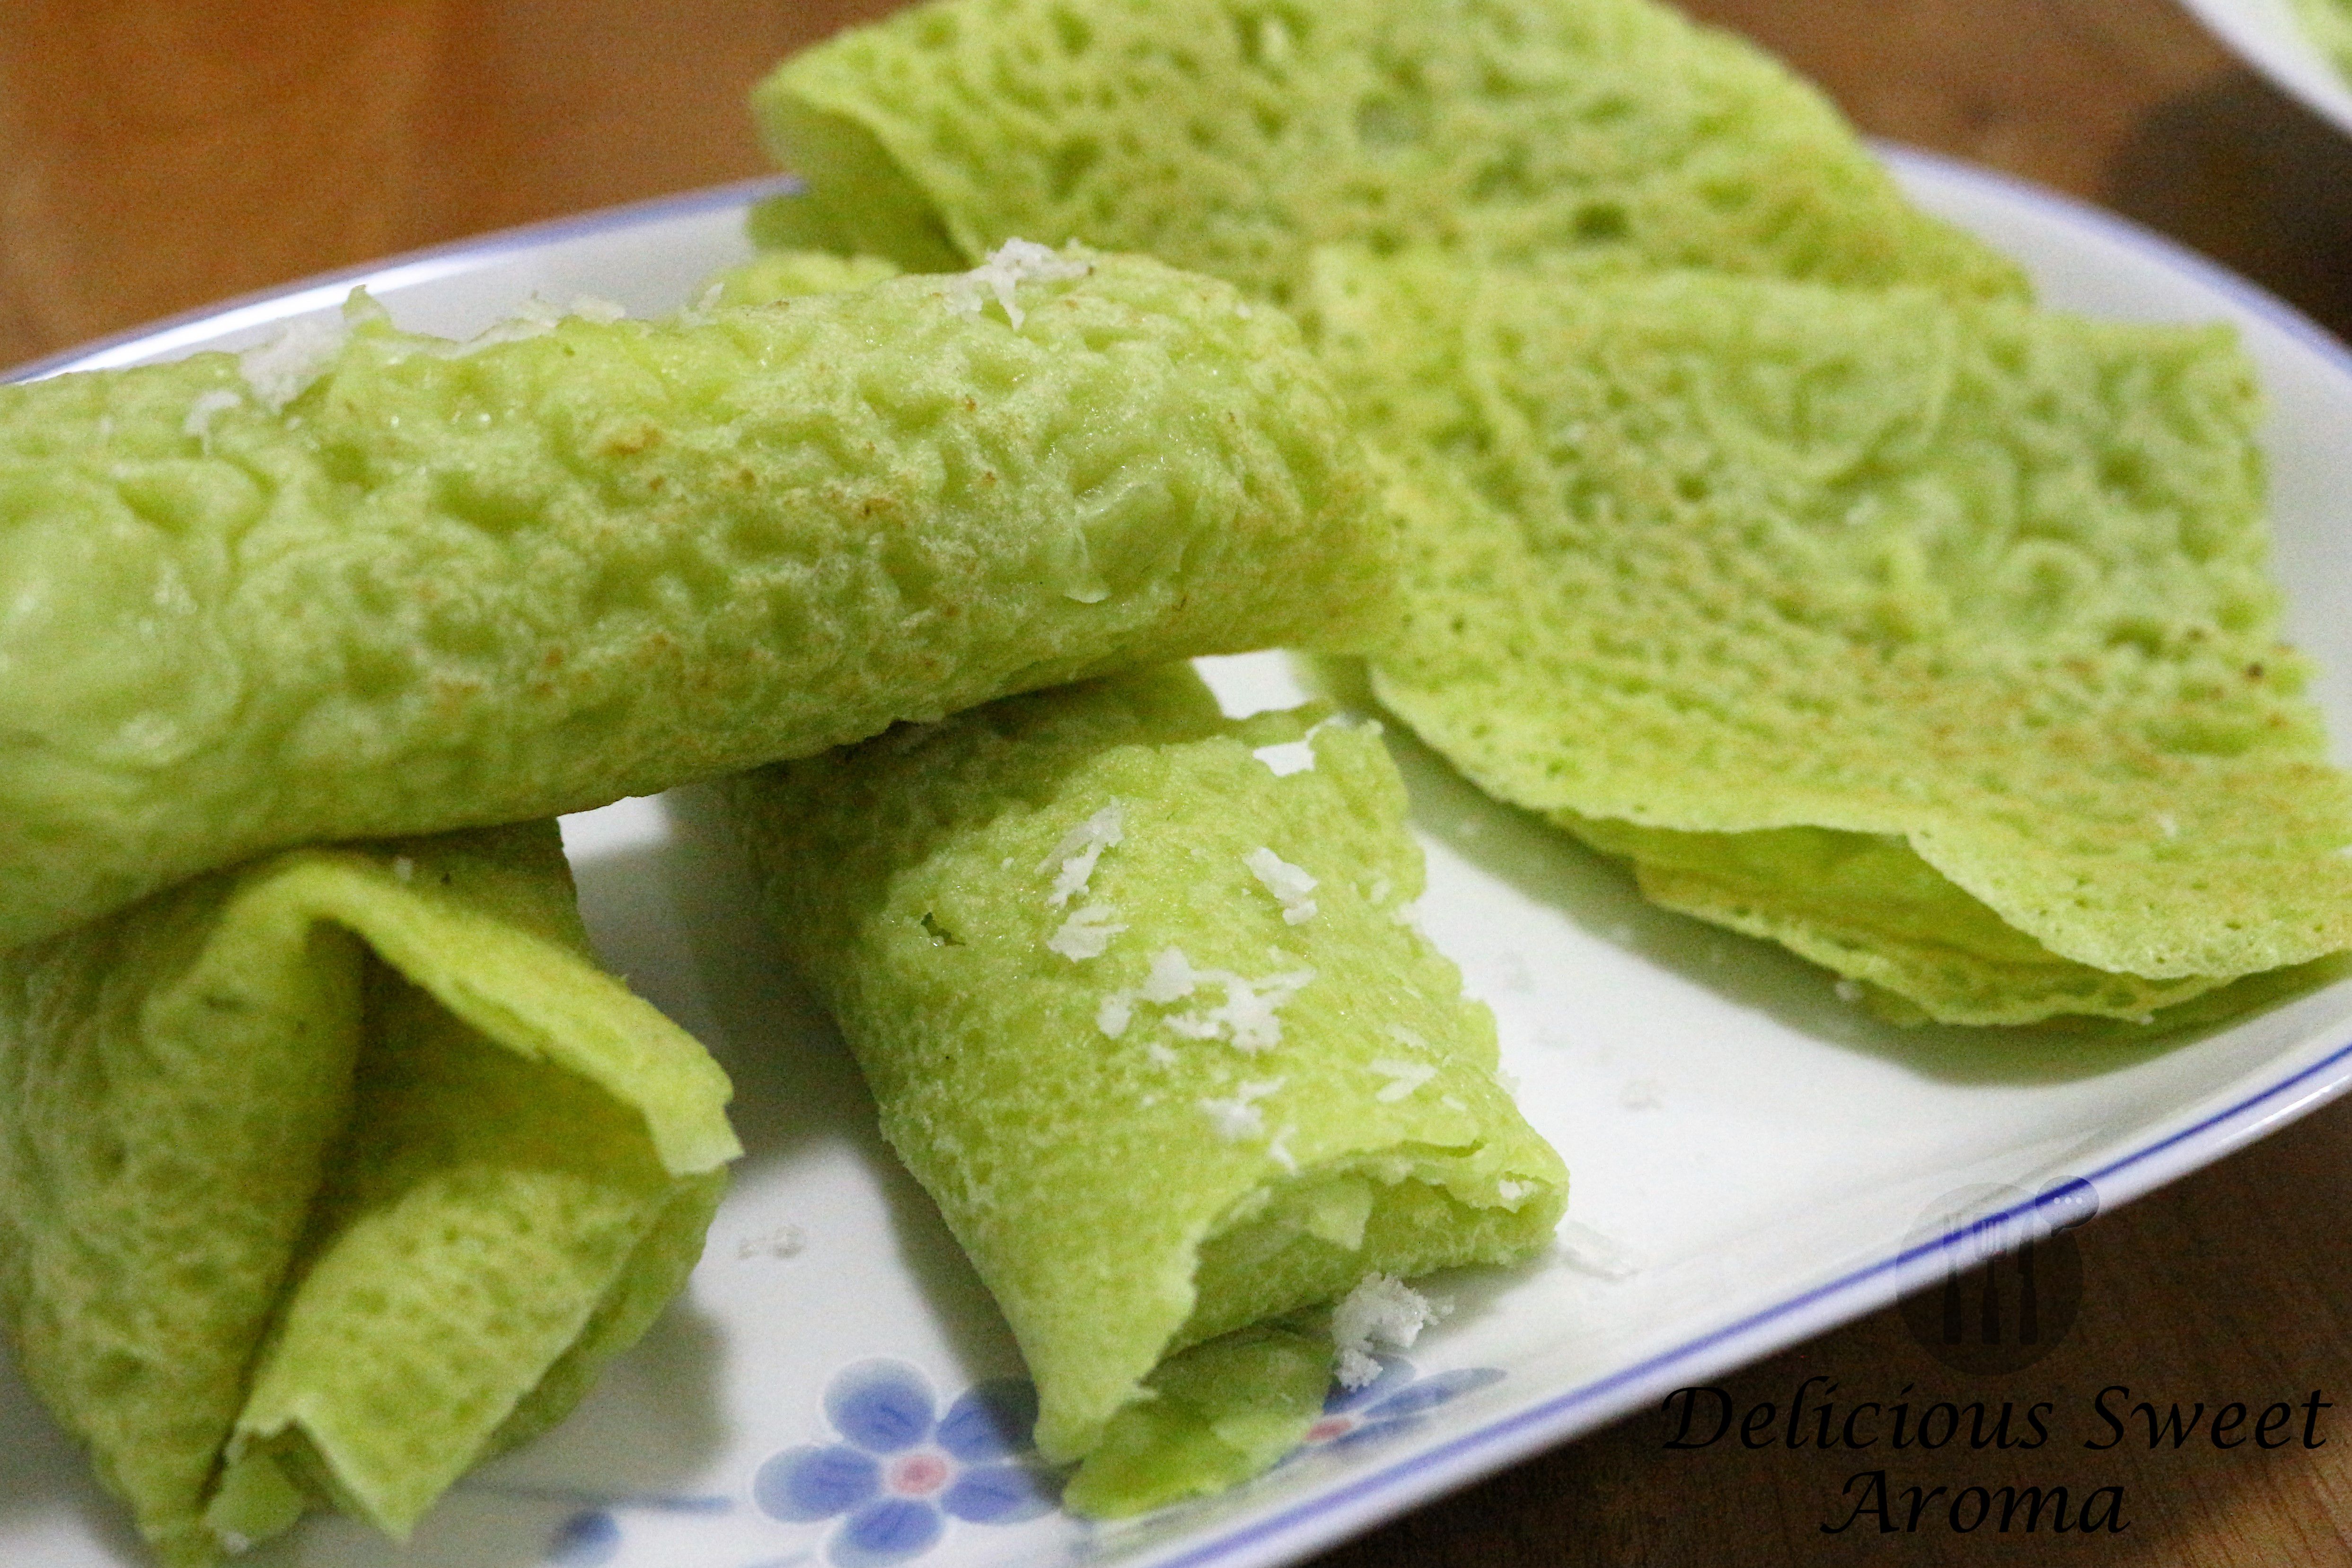
Lotus Leaf Bun is a chinese steamed bun, named after their shape as it is folded in the form of a lotus leaf with a opening with variations in filling like meat, prawns or sweet. They are also called as Bau, pau in Mandarin or Chinese bun which is locally found at hawkers or restaurants in Singapore.

I bought the Leaf Buns at a local supermarket. It was already cooked and just needed a filling. So, I split the bun and filled it with sweet coconut-jaggery, is commonly used filling in our Mangalorean sweet dishes. While steaming the jaggery melts with its juicy flavor and sweetness.The sweetness depends on the  amount of jaggery used for the filling.  It can be served for breakfast or as a quick tea time snack.

Preparation time: 15 minutes

Cooking time: 10 minutes

Ingredients

Leaf Bun / Pau / any bun – 10 pieces

Pounded jaggery – 1/4 cup

Grated Coconut – 2/3 cup

Cardamom seeds/Powder – 2 pinch, if using the seeds then powder them with a pestle


Directions

1. In a small bowl add the powdered jaggery, coconut and cardamom powder. Mix with a spoon.

coconut, jaggery, cardamom

2. Slice these delicate lotus leaf buns with a knife. Consider stopping just short of the long end (this way, you can open it up like a hot dog bun and stuff it with the filling).

Lotus Leaf Bun

3. Stuff the buns with the coconut-jaggery filling using a small spoon.

Bun, Lotus Leaf Bun

4. Place them on a steamer basket with parchment paper as a lining. Cover with a Al-foil.

Lotus Leaf Buns (steamend with sweet coconut jaggery filling)

5. Fill a pot with water. Get it to a boil. Place the basket over the pot (this can also be done using a rice cooker). Steam on medium heat for 10 minutes without disturbing.

Steamer

6. Remove the foil that covers the basket (hot steam is released when removing, hence make sure not to burn yourself). You will notice that the jaggery filling has melted making it juicy.

Enjoy hot leaf buns with sweet juicy filling. I love having them for tea.

Lotus Leaf Bun


Stay Healthy!

Note:

*Sweet flavor can be adjusted based on the quantity of jaggery incorporated.


Read More

Beef Meatball Curry

This is my second best dish of beef mince I am posting here today. Beef meatball curry recipe has a delicious creamy texture with a sweet taste. Since I used thick sour yogurt it was slightly sour which enhanced the flavor with other combination of spices. Adding yogurt can also reduce the heat of the dish, hence you can adjust the addition of yogurt. It can be served with rice, used as a dip with bread or as a side dish.


Preparation time: 25 minutes

Cooking time: 35 minutes

Ingredients

Minced Beef – 250 g

Cumin seeds – 1 tsp

Stew powder – 2 tbsp

Coriander powder – 2 tbsp

Ginger-Garlic paste – 1/2 tbsp

Red chili powder – 1 tbsp

Thick Yogurt – 5 tbsp, lightly whisk using a spoon before adding 

Coriander leaves for garnish 

For paste:

Fenugreek seeds – 1/4 tsp

Onions – 1 medium, roughly chopped

Green chilies – 1

Coriander seeds – 1 tbsp (optional if your adding later as a powder)

Red dried chilies – 2

Turmeric powder – 1/4 tsp

Thick Yogurt – 1 tbsp

Water – 1 cup

For the meat balls:

Onions – 1 small, chopped finely

Ginger-Garlic paste – 1 tbsp

Coriander leaves – 1 tbsp

Red chili powder – 1 tbsp

Stew powder – 1 tsp

Eggs – 1 

Thick Yogurt – 1 tbsp

Gram flour – 1 tbsp

Salt – 1/2 tsp


Directions

1. To the mince meat, add the ingredients mentioned under meat balls. Mix well with a spoon and set aside for 20 – 30 minutes. Make round balls of 4-5 cm diameter. Reserve for later.

onions chopped

Finely chopped Onions

meat ball ingredients

Meat balls

Beef balls

2. Heat 1 tbsp ghee on medium. Add the fenugreek seeds and onions (mentioned under paste). Fry for 3-4 minutes or until the onions are slightly brown. Let it cool.

Onions, fenugreek seeds

3. In a blender add little water, the fried mixture, red chili, green chili, yogurt, turmeric powder.

curry paste, blender

4. Using a deep sauce pan heat 2 tbsp ghee. Add the paste from the blender and fry for 1 minute. Add the reserved paste along with the water. 


5. Add cumin seeds, stew powder, ginger-garlic, red chili powder, 1/2 tsp salt, coriander powder, whisked yogurt. Add more water if necessary (curry must be thick). Mix well. Leave it on medium heat to boil.

curry paste

6. Add the meat balls one by one. Cover and cook to boil. Keep it on low to cook for another 5 minutes. 

beef meat ball

Garnish with coriander leaves before serving. 

Beef Meatball Curry


Stay Healthy!

Read More

Garlic Shrimp fry

Shrimps are one of my favorite. This pan fried shrimp recipe is one of the easy recipes to prepare when your craving to have something fried with spice. Not shelling the shrimp gives it a glorious spice filled flavor of garlic. I used fresh garlic as I was out of stock of garlic paste. If you have garlic paste, using it would allow the shrimps to absorb the juices faster from the marinade paste.

Preparation time: 15 minutes

Cooking time: 15 -20 minutes

Ingredients

Whole shrimps – 250 g, Washed with legs and veins removed

Olive oil / Butter for frying

Garlic clove – 1


For the marinade

Fresh Garlic – 1 tbsp, minced

Fresh Ginger – 1/2 tsp, minced

Turmeric powder – 1/4 tsp

Vinegar – 1 tbsp

Light Soya sauce – 1 tsp

Red kashmiri chili powder – 1 1/2 tbsp

Paprika powder – 1 tsp

Salt – 1/2 tsp


Directions

1. Marinate the Shrimps with the ingredients mentioned under marinade overnight or for 1 hour.

marinade

shrimp

2. Heat oil in a pan on medium-high heat and drop a piece of garlic. Fry for a couple of seconds and then thrown in the shrimps.

garlic

Shrimp fry

3. Cover and fry for 2 minutes. Flip the sides and cook for another 2 minutes. You will see the water steaming out slowly and shrimps curling. Let the water dry out. Fry for another 2-3 minutes. 

shrimp

4. Repeat the same for the rest of the shrimps.

Serve hot and enjoy as a starter!Garlic Prawn Fry.


Stay Healthy!


Read More

Mangalorean Pancake With Pandan

Makes: 12 – 15

Preparation time: 20 minutes plus soaking time for 2 hrs

Cook time: 25 minutes

Mangalore is a small town where I grew up, which is located along the coast in South-West of India along the Arabian Sea with its beaches, popular for its sunset views. If you plan to visit south of India make sure to try this for breakfast in the local restaurants. The pancake filling of coconut just kills your hunger with its taste and flavor. These pancakes are called as ‘panpole’ (pan-pole) in Konkani (mother-tongue) and ‘Neer-Dosa’ in Tulu/Kannada language (spoken locally).

I always visit this one local bakery in Singapore, where they always have many different varieties of breads and baked cakes. So, as I was strolling by, I paused to take a peek. While buying my usual bread, at the cash counter they sold a limited quantity of these green rolled pancakes which enticed me to try them out. As I munched, to my surprise, I found this coconut filling inside which got back my memories of Mangalorean pancake filling. They are traditionally plain white made from rice grains with a combination of freshly grated coconut. In this recipe I have used the color green from the leaves of Pandan which also has an aromatic flavor for enhancement. You can skip the color and make them plain white as well.


Ingredients

White small grain rice – 1 1/4 cup (Idli / Surai) *see notes

Vegetable Oil – 2 Tbsp (for greasing)

Grated coconut (optional) – 3 tbsp, for the batter

Water  for the batter

Pandan Leaves/ Juice – 3 (optional for color)

Salt

Extra grated coconut for the pancake filling + Sugar (optional)


Directions

For the color ( Optional )

+ Cut the pandan leaves into 3 inches and wash them thoroughly with water.

pandan-leaves_img_4579

+ Cut them thinly. Place in a blender with 1/4 cup water to make a paste enough to squeeze the liquid.

pandan leaves

+ Place a strainer over a bowl and transfer the paste into the strainer. Using a spoon press the solid paste to separate the liquid in the bowl.

Pandan juice, paste

+ Set aside the pandan juice.


1. Soak the rice for 2.5 hours.

small grain rice

2. Grind the rice, grated coconut if using, pandan juice and 1/2 cup of water for a few minutes in a blender until smooth paste (I always make it in batches where it is half filled so that it can blend smoothly without over filling. If you add too much water it might be hard to get a smooth paste. It shouldn’t be too grainy when running it through you fingers). Transfer the batter into a container.

blender

pancake batter

3. Now, add 1/2 tsp salt and 1/2 cup of water to make a thin batter. Prepare a small bowl or plate with 2 tbsp of vegetable oil and half onion pinned with a fork to grease the pan (my mom used to do this for easier greasing). Discard the onion after use. 

pancake batter

onion,oil, greasing

4. Get the pan hot on medium heat (I used a flat non-stick pan). Dip the onion in

vegetable oil and grease the pan with oil.

greasing

5. Using a ladle, pour the mixture at the center (you will hear a sizzle if the pan is hot enough), swirl the pan quickly to spread the batter so that it covers the base of the pan and cover with a lid. Cook for 1 minute and transfer to cool.

Mangalore pancake

6. Fold the pancake into quarter after cooling. Repeat the  above step for the rest of the batter.

mangalore pancake, panpole

7. Serve hot with gravy or curry. I ate a few with coconut. It was filling!

Mangalorean Pancake With Pandan

 For plain pancake or neer dosa you can serve it with any dip of choice. We sometimes use chutney of coconut and coriander as a dip for breakfast which can be done in minutes.

Notes:

*for more pictures on white grain, idli or dosa rice used please refer link.


Serving with coconut:

+ In a bowl take few tablespoons of freshly grated coconut with required amount of sugar. Mix.

grated coconut, sugar

+ Place 1 tbsp of the coconut mix on one end of the pancake, an inch apart from the circumference, fold the corners and roll. Serve hot or warm. 


This is how it looks without the pandan color/juice (updated)

Rice pancake/Panpale/Neer Dosa recipe | Delicious Sweet Aroma


Stay Healthy!


Read More

Pineapple, Honey and Pistachio Flapjacks

It’s been a while since my last post. I have been out of town and hence didn’t find time to post. So, hold your horses, because soon I will be posting about my getaway experience.

Now since I’m back, after settling in, I tried this delicious easy snack, flapjacks recipe like an oat bar which makes it simply the best and perfect recipe to try out for family and kids with a fantastic combination of buttery sweetness that gives it a heavenly taste. It is crispy and chewy, good for all-time lunchtime or tea time snack. You can add any fruits, nuts and still get a great taste.

Preparation time: 25 minutes

Cooking time: 35 minutes

Ingredients

Dried pineapple – 90 g

Pistachio nuts – 40 g

Rolled oats – 120 g

dry fruit, pistachio, oats

Unsalted butter – 160 g, plus extra for greasing

Brown Sugar – 160 g

Honey – 2 tbsp


Directions

1. Preheat oven to 160 degree Celsius / 325 deg F.

2. Put the butter, brown sugar and honey in a small saucepan. Heat on medium until melted for 3-4 minutes.

brown sugar,honey, butter

3. Into a mixing bowl, tip the oats, dried pineapple and pistachio. Pour over the melted melted butter mixture and stir to combine.

dry fruit, pistachio, oats

Dried pineapple, oats and pistachio nuts

butter, brown sugar, honey

Melted butter, brown sugar and honey

4. Tip the above mixture into a 12”x 8”- rectangular greased and lined with parchment paper baking tray. Press down to flatted the surface. Bake for 30 minutes, at 160 degree Celsius or until golden brown.

flapjacks

5. Remove baking tray from the oven and cool in tray until crisp. Slice the flapjacks into desired pieces and serve.

Pineapple, Honey and Pistachio Flapjacks


Storing

*Keep in an airtight container for up to 3 days.


Stay Healthy!


Read More

Cream Of Chicken Soup

I do not prepare soups very often, since I live in a tropical climate. However, when I do prepare a soup, it’s the cream of chicken soup that has been on my menu once in every two weeks. I always have chicken breasts in my shopping cart for easy quick meals and this recipe has been very simple, very delicious with a creamy texture which is satisfying. It’s light and flavorful. As I keep discovering more soup recipes stay tuned.

Preparation time : 5 minutes

Cooking time : 30 minutes

Ingredients

Chicken breasts – 200 g, cut thinly and small

Unsalted Butter – 2 tbsp

Garlic cloves – 2, minced

Onions –  1 small, chopped

All purpose flour / Maida – 3 tbsp

Water – 2 1/2 cups

Pepper powder – 1/2 tbsp

Milk – 1/2 cup

Sugar – 1 tsp

Salt as per taste


Directions

1. Heat a saucepan, add butter. To the melted butter add garlic and onions.Stir for 1-2 minutes on medium till the onions become translucent.

onions,garlic

2. Add flour. Stir together for a minute, add chicken pieces and 1/4 tsp salt. Mix well for a minute.

all-purpose flour

chicken breasts

chicken

3. Pour 2 cups water, pepper, combine well. Reduce heat to low, let it cook for 10-15 minutes with constant stirring to thicken as desired (the volume will be slightly reduced).

pepper,water, chicken

4. Add milk and 1/2 cup water. Mix to boil for 5 minutes. If necessary add more salt.

milk

5. Garnish with 1 tsp of butter and serve hot with bread.

Cream Of Chicken Soup


Stay Healthy!


Read More

Easy Beetroot Rice

When I say Beetroot rice, what is the first thing you notice? Oh yes! The color, of course. It’s gorgeous purple/red color is so deep and vibrant, that when combined with rice, just makes a wonderful one pot easy recipe.

If you have tried this, then drop a feedback of your recipe.


Preparation time: 10 minutes

Cooking time: 20 minutes

Serves: 3-4

Ingredients

Olive oil/Ghee – 2 tbsp

Grated Beetroot – 1 big size

Basmathi rice/ Ponni rice – 1 cup

Onions (optional) – 1 medium, cut into thin long strips

Green chilies – 1

Cinnamon – 1 bark

Cardamom – 2

Fennel seeds – 1/4 tsp

Salt – 3/4 tsp

Water – 2 cups

 Beetrootbeetroot, onions


Directions

1. In a pressure cooker or deep sauce pan (see notes if your using electric rice cooker) add 2 tbsp olive oil/ghee. Fry the cinnamon, cardamom and fennel for a minute on medium.

cinnamon, cardamom, fennel seeds

2. Add onions, green chilies, grated beetroot and salt. Stir well and fry for 4 minutes until its slightly less raw.

onions, green chilies

beetroot, onions

3. Now, add rice with 2 cups of water( twice the quantity of rice taken). Mix and taste for salt. Add more if necessary. 

rice, beetroot

beetroot

4. Close and cook (for pressure cookers one whistle, if using electric rice cooker check in 15 mins if the rice is cooked and make sure not to over mix)


My Beetroot Rice is ready with Papad (it’s tortilla like) and some cheesy pork sausages. Yummm!!

Easy Beetroot Rice


Notes

*If your using an electric rice cooker. First, fry all the ingredients till step 2, add rice, water and check for salt. Transfer the contents to the cooker and cook.


Stay Healthy!


Read More

Baked Jaggery Pancake Muffin

I love this version of baked muffin, as it gave me a taste of all the flavors of snacks we used to have as a kid and even now. The main components being jaggery and cinnamon, is just a lovely combination! It’s an evening snack recipe, easy to prepare in less than an hour.

In South Indian Mangalorean cuisine, the same recipe is used to make “Appa” (pancake balls) traditionally  prepared during festive seasons mostly by the Hindu households. It is sweet and light. It is cooked/steamed on a stove top in a aebleskiver pan, with a distinctive shape of a sphere.

Preparation Time: 10 minutes

Cooking time: 7 minutes

Makes: 6

Required Appliance: Electric Blender

Ingredients

Beaten rice – 1/4 cup

Jaggery – 1/4 cup, pounded into small pieces

Fresh grated coconut – 1/4 cup, (can use desiccated coconut, if fresh coconut is not available)

Salt – 1/8 tsp

Baking powder – 1/4 tsp, (or baking soda 1/8 tsp)

Coarse semolina – 1 tbsp

Cardamom pods – 1, seeds crushed

Chapathi flour – 1/2 cup, if necessary can add more

Ghee to coat the pan

Directions

1. Preheat oven at 200 degree Celsius (390 degrees Fahrenheit).

2. Place the beaten rice in a strainer and wash under cold running water so that the beaten rice flakes are wet and soft. Tap to strain excess water.

beaten rice

3. Now, using an Electric blender, add the beaten rice, jaggery, coconut and salt with 1/4 cup (75 ml) water. Blend for 2 mins to form a thick batter.

beaten rice, jaggery, coconut

batter

4. Transfer the batter to a bowl  and add  1/4 cup water into the blender to recover the rest of the batter. Pour this into the bowl.

5. Stir in the baking powder, semolina, cardamom. Gradually, stir in the chapathi flour mixing between each addition.

baking powder, batter

Batter, semolina

cardamom, batter

Batter, flour

6. Make a thick batter of pouring consistency. After they are well combined. Let the batter rest for 30 minutes at room temperature.

Baked Jaggery Muffin

7. Prepare the muffin pan by brushing it with ghee.

muffin pan, cup cake tray, ghee

8. After 30 minutes, pour the batter into the pan and insert it into the middle of the oven. Bake at 200 degree Celsius for 10 minutes or until you see it starts browning. Remove it out of the oven and flip them upside down. Place the tray back in the oven and bake for another 2 minutes.

batter

9. Remove the pan out of the oven. Carefully remove the each muffin and place it on a serving plate to cool. It tastes good when it is hot or cold. Enjoy!

Baked Jaggery Muffin
After the flip
Baked Jaggery Muffin

Note

*Double the ingredients if you want to prepare more quantity of muffins.

*I used Pillsbury ‘Chakki Atta’ (Indian chapathi flour) for this recipe.

Stay Healthy!

Read More

Pork stir fry

I’ve always wanted to prepare something easy as a side dish just like the restaurants and this homemade stir fry recipe will knock your socks off!

Preparation time: 5 minutes

Cooking time: 30 minutes


Ingredients

Olive oil for frying

Red bell pepper – 1 big, cut into medium small (optional)

Green bell pepper – 1 big, cut into medium small 

Onion – 1 Medium, chopped

Sesame oil – 2 tbsp

Light Soya sauce – 1 tbsp

Ginger-Garlic paste – 1 tsp

Red chili powder – 1 tsp

Nando’s Peri-Peri Sauce (Mild) – 3 tbsp


For the marinade (Can fry instantly or can store it in the fridge for half an hour before frying)

Pork Shoulder meat – 300g, sliced as thinly as possible to make 3/4 inch wide of 1 1/2 ich long.

Light Soya sauce – 2 tbsp

pork shoulder meat


Directions

1. Mix the Marinated pork. In a heated wok/skillet with 1 tbsp of olive oil fry the marinated pork with its soya sauce in batches on high heat. Keep stirring well for approximate 10 minutes or until you see it turning brown (*see notes). Strain the fat and transfer pork into a container and keep aside.

Pork

pork fried


2. Using the same wok with the leftover fat, add sesame oil, onions, Green bell peppers, ginger-garlic paste. Stir together for 2 minutes. Add soya sauce. Mix well for less than 1 minute, then add the fried pork, chili powder. Toss and fry for another 1-2 minutes and not longer to retain the crispness of the vegetables.

bell peppers, onion

pork, bell pe

3. Pour the Nando’s sauce. Stir for 1-2 minutes. 

Nando's sauce

Remove from heat and serve hot as a side.

Pork Stir Fry


Notes

*Initially when frying pork, water oozes out and in a couple of minutes it starts drying out. Keep tossing the pork at this point and reduce heat if necessary. Stir every half a minute until you see the fat being released out by itself.

*If necessary add salt, but I haven’t added any salt as soya sauce has some salt content.

*To serve it crisp for later use, make sure the wok lid is not fully covered and let the steam away by keeping the lid slightly open.


Stay Healthy!

Read More

Chicken Schnitzel

When I think of Schnitzel, it takes me back to the day when a friend of mine had invited me over for Christmas and we had prepared Schnitzel for dinner along with the other friends.

Schnitzel meaning meat in a crust, is a German word and a very popular dish originating in Austria. In the Viennese cuisine, Vienna or Wien, the dish called “Wiener Schnitzel” is traditionally made from veal served with potato salad (Kartoffelsalat). So, if you visit Austria and the most beautiful city Vienna do not miss it.

Schnitzel can be made by using variety of meat and Chicken Schnitzel is one of them. Adding butter when frying gives the buttery rich nutty flavor.

Preparation time: 15 minutes

Cook: 15 Minutes

Serves: 2


Ingredients

Unsalted butter – 4 tbsp

Vegetable Oil for frying – 1 1/2 cup

Boneless chicken breasts or fillet – 2 pieces

All-purpose Flour – 1 cup

Egg – 1 whole

Bread crumbs (Semmelbrösel) – 2 cups

Salt


Directions

1. When you have the chicken cut into manageable thickness, it can then be tenderized to desired thickness by a mallet or a hammer. To do this, place the meat on a cutting board or an aluminum foil. Place the plastic wrap over the chicken and pound down to even thickness (gently pound them). Add salt on both sides.

Chicken

tenderized Chicken

2. Place the eggs on a plate and stir lightly with a fork, add a pinch of salt. Prepare two more plates, one with flour and the other with bread crumbs.

flour, egg, breadcrumbs

3. Lightly coat the chicken with the flour, then dip it into the egg, and then finally coat it with bread crumbs. Place it in a separate plate.

Chicken,flour

egg, chicken

chicken, breadcrumbs

coated chicken


4. Heat oil and butter in a large pan, let the oil heat until bubbly on medium. Fry the schnitzel on one side for a minute and turn side. Keep tossing the chicken for 6 – 7 minutes until golden brown.

oil,butter,chicken coated

chicken

5. Place them on paper towels to drain excess oil. Serve hot with lime and potato salad.

Chicken Schnitzel


Note

* Frying with the addition of oil than just plain butter will not burn very quickly.

* For this recipe one would need fine bread crumbs. If you can find Semmelbrösel bread crumbs at your local store, it would be the best to use.


Stay Healthy!


Read More