Tag: Mangalorean cuisine

Patholi (Mangalorean Recipe) or Sweet Rice Dumplings Steamed with Turmeric Leaves

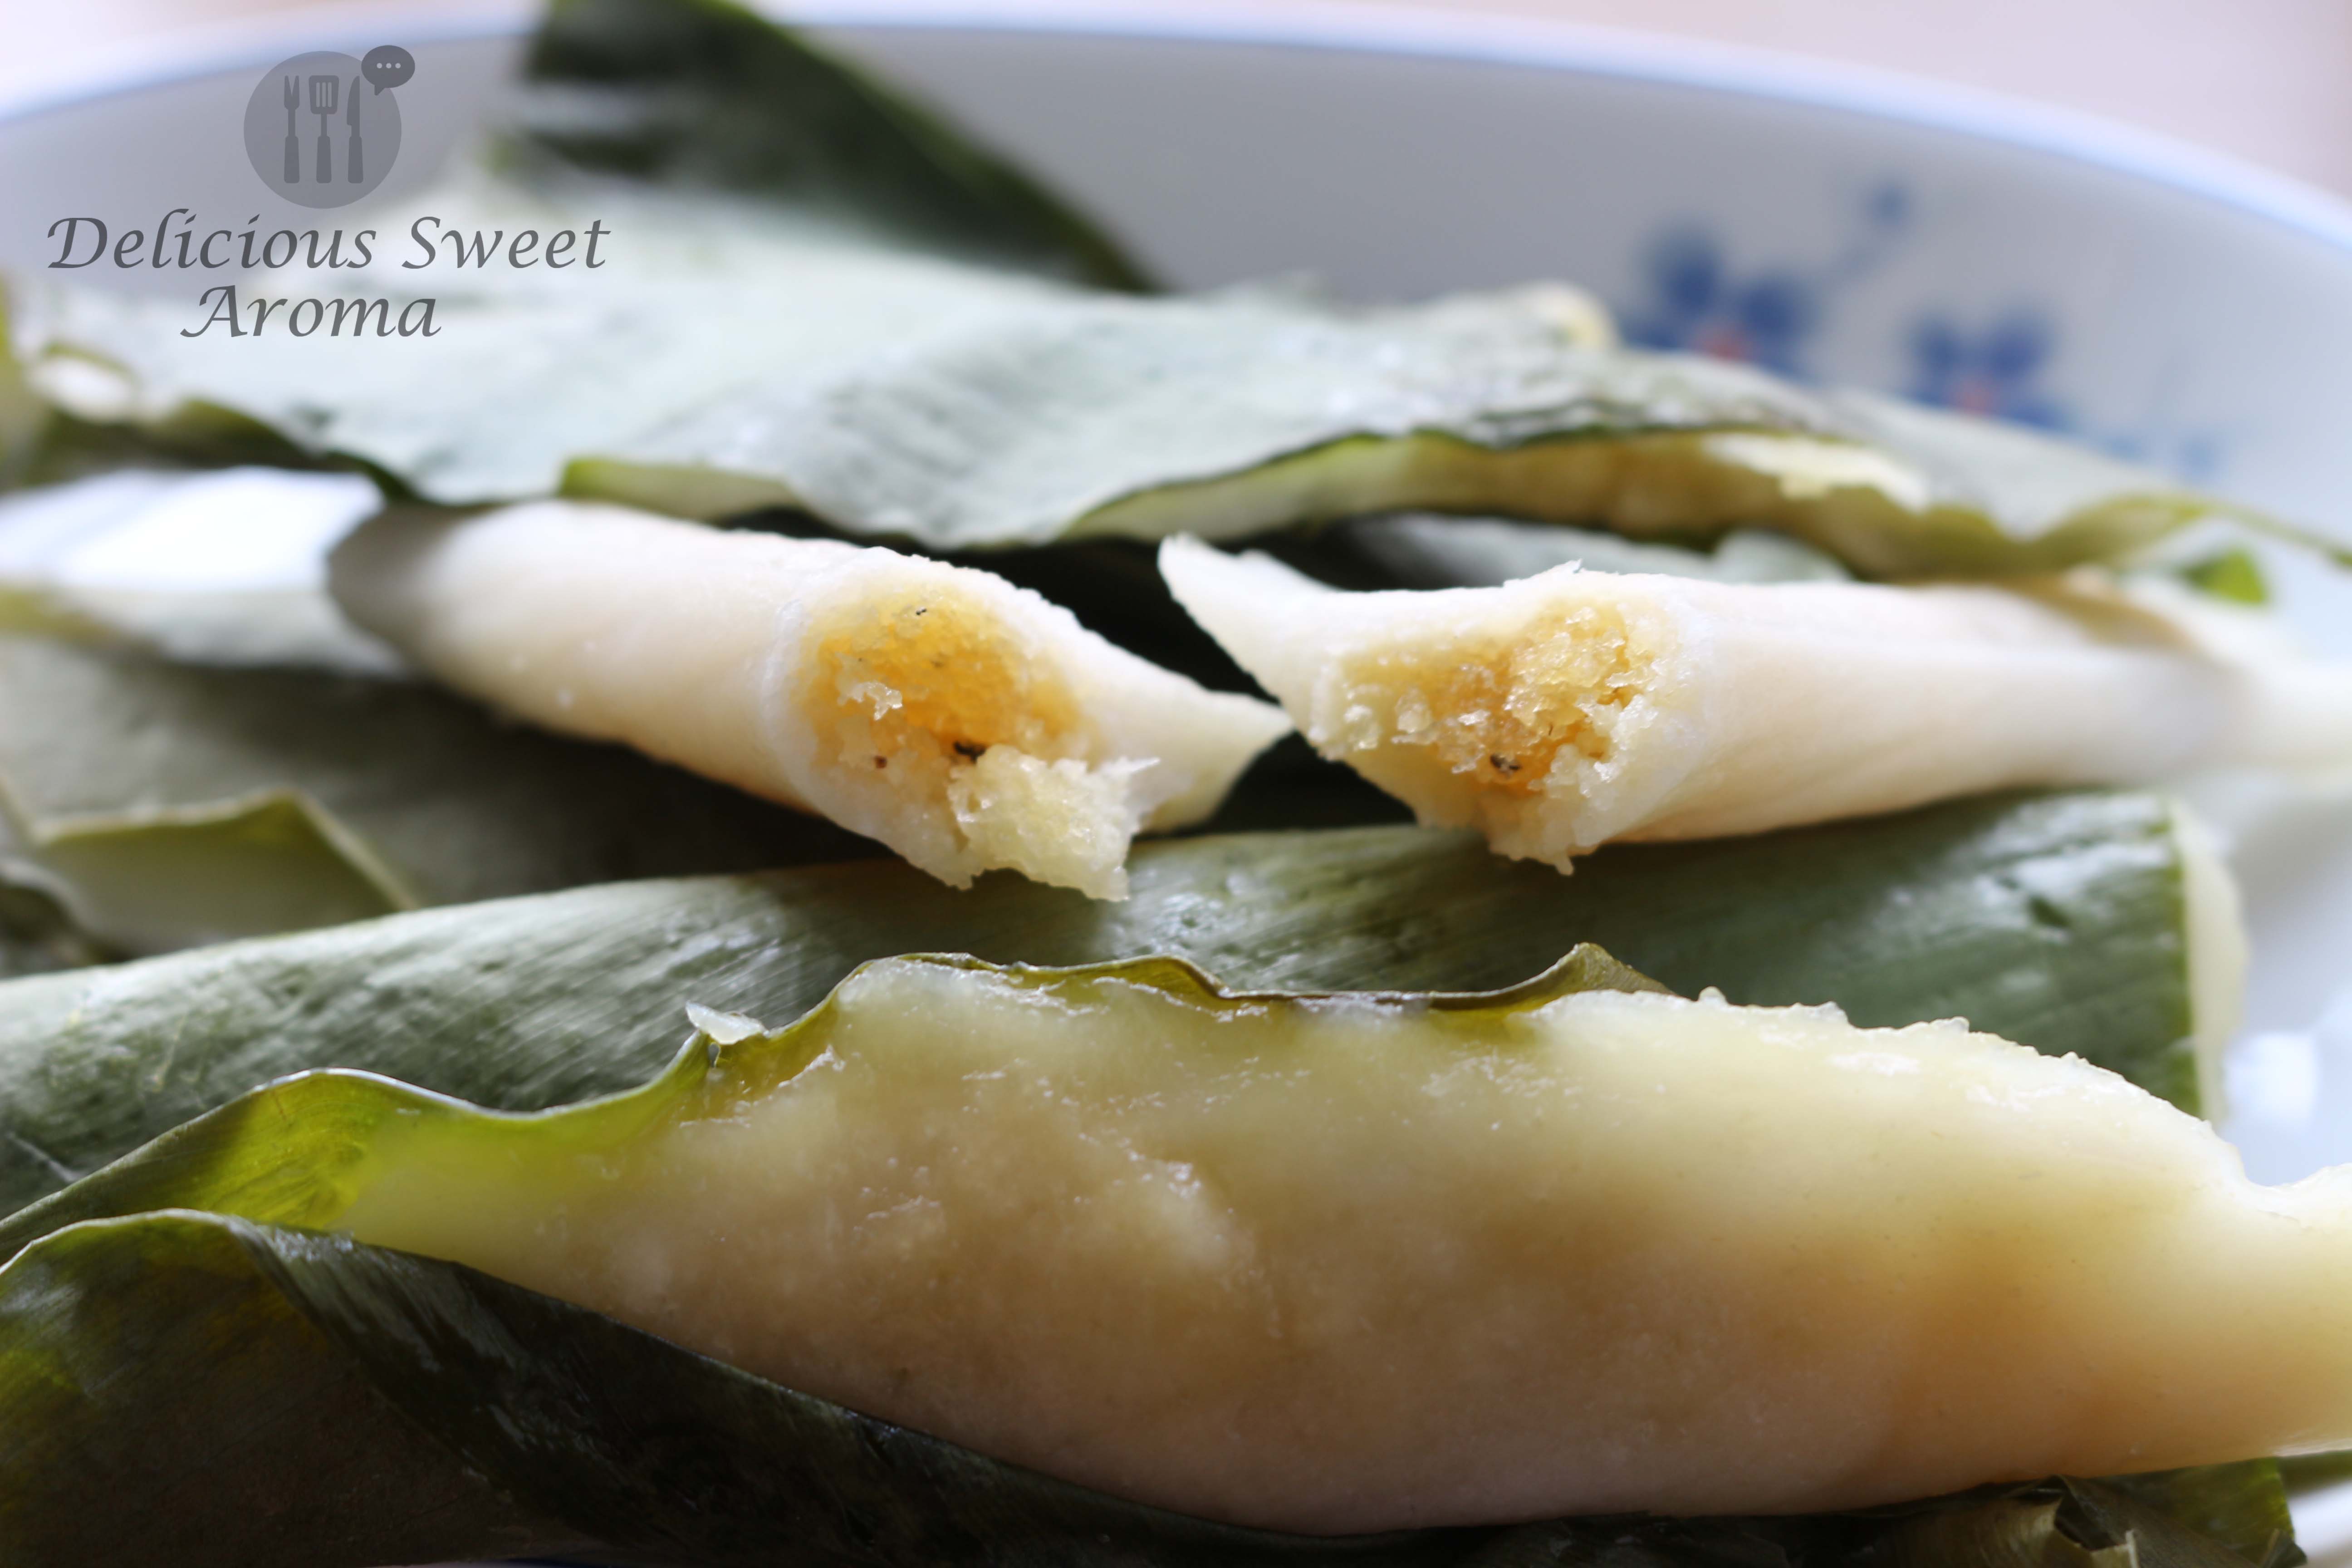
They say:”The key to everything is patience”. That defines my recipe today. I prepared it last weekend. Sweet Rice Dumplings are a typical Mangalorean sweet dish. Sweet Rice Dumplings with turmeric leaves have another name. They are commonly known as Haldikolyache Patholi in Konkani language (mother-tongue in South-West coast of India). Its made with rice filled with Jaggery-coconut mixture, wrapped in turmeric leaves which makes it a special dish.

Patholi, as we call it, was traditionally made at home. It was especially common when turmeric leaves were in abundance in my grandmother’s backyard during the monsoon season. While in Singapore, I discovered turmeric leaves at the supermarket and felt a strong craving for them. These leaves are used because of their unique flavor and delightful aroma. So, if you happen to have turmeric leaves in the local supermarket, I can assure you. This recipe won’t disappoint you.

Let me tell you a little about this popular “superfood sweetener” commonly used in India. Our elders always prepared sweet dishes with a sweetener called ‘Jaggery‘, Gur in hindi, Bella in Kannada. Jaggery varies in colors. It ranges from golden brown to brown and dark brown. Jaggery is known to have the ability to cleanse your body. Jaggery and sugar both are obtained from the same source of sugarcane juice. However, jaggery is unrefined sugar. The sugarcane juice undergoes a boiling process. The syrup is boiled continuously until it forms a thick paste. This paste is then poured into molds to form solid blocks.

Why is jaggery a “healthy” replacement for sugar? Unlike sugar, which is absorbed by the body quickly with a sudden burst of energy, jaggery is absorbed slowly. It releases energy over an extended period of time. Now, this is just one form of jaggery. The others are jaggery from palm sugar and so on..which I haven’t used in my recipes yet.

Soaking time: 2.5 hrs

Preparation time: 30- 45 minutes

Cooking time: 12 minutes

Ingredients

Raw rice / Boiled Rice / Surai or Ponni rice – 3/4 cup or 180 g (preferably boiled rice ) (*EDIT)

White small grain / Idli rice – 3/4 cup or 180 g (‘mutambo’ rice in Konkani)

Salt

Medium size turmeric leaves / Haldi leaves – 15 to 17, stemmed, rinsed and wiped dry (*see notes)

For the filling:

Pounded jaggery – 150 g or 3/4 cup (as per sweetness)

Grated fresh coconut – 120 g (*see notes)

Cardamom – 4 pods, seeds powdered

Directions

To save time, prepare the first two steps of the rice dumplings batter a day in advance.

1. First step soaking the rice : Mix and wash the boiled/ponni rice with water in a bowl. Do the same with the white small grain rice. Wash each type of rice once.

patholi ingredients

2. Next is making a smooth batter: Using a blender, add the rice and 1/2 tsp of salt. With very less amount of water as possible make a thick smooth paste. I divided the rice into 2 batches. This made it easier to grind. It resulted in a nice smooth paste and less grainy texture for the rice dumplings.

step2a_IMG_6999

step2b_IMG_7003

3. Preparing the filling: In a small bowl add powdered jaggery, coconut and cardamom powder. Stir thoroughly until the mixture is smooth and free of lumps.

step31a_IMG_7008

step 31_IMG_7016

4. Prepare the turmeric leaves (*see notes). Place a tablespoon of batter or just scoop it with your fingers. Spread the batter evenly over the shiny part of the turmeric leaf. Make sure it is not too thick or too thin. Leave a 1-inch gap along the edges.

step4_IMG_7019

5. Using a teaspoon, add the jaggery-coconut mixture along the center-line of the leaf.

filling

Fold the leaf in half starting from one end, gently pressing the edges along its length. Repeat the process of step 4 with the remaining leaves and place them on a  plate.

step4c_IMG_7023

6. Using a steamer or a wok. Pour 1 1/2 cup of water. Place a small plate over the steamer plate with holes. Make sure it is at least an inch or two above the water level. Bring the water to a boil.

Steaming patholi using a wok

Arrange the leaves on the steamer plate at different angles, layering them as needed. Cover with the lid and cook on high (induction 8) for 12 minutes.

Patholi (Mangalorean recipe)

7. The rice dumplings are ready when a toothpick inserted into it comes clean. Remove the leaves from the steamer using tongs and place it on a plate.

Peel the leaves from one end and discard. It tastes best when its piping hot. Hope you like it. Happy cooking.

final4_IMG_7032

final1_IMG_7040

Patholi, Mangalorean recipe

Note:

*If your using fresh coconut that has been in the freezer. Place it out on the kitchen counter an hour in advance to thaw and soften.

*If the turmeric leaves are too long you can cut them into half first and then place the batter.

* Since I made this recipe for 2 servings, I used just half the batter and made 8 leaves one day and the rest I used it another day. The coconut-jaggery filling can be stored in the fridge for a day or two to reuse later. Do not keep the filling stored too long as it will go bad.

EDITs:

In case you’re wondering how to pound jaggery, put the jaggery cubes in a ziplock bag. Use any object to pound them. Do the same with cardamom if you do not use a mortar and pestle.

For any updates on this page or website please follow my Facebook page >> Delicious Sweet Aroma << . If you have trouble viewing certain pages, comment here. You can also drop a message on Facebook.

I’m also available on INSTAGRAM  📲 👉👉  delicioussweetaroma

Read more: Patholi (Mangalorean Recipe) or Sweet Rice Dumplings Steamed with Turmeric Leaves

Rose Cookies – Mangalorean Kokkisan

Flower Crab

Read More

Mutton Ghee Roast

I have always had sides of mutton recipes in Indian restaurants and it never occurred to me how easy it was to cook at home. Its not so often that I prepare mutton at home because its not available everywhere, especially in supermarkets where pork, chicken or beef is easily available.

Mutton Ghee Roast is another recipe from Mangalore where the spicy freshly ground chili paste is roasted in ghee and then tossed with cooked mutton which imparts a rich delicious flavor of the spices to the meat. You can also prepare this with chicken where I have posted a recipe of Chicken Ghee Roast. This recipe has a mild spice, so do not be afraid to use the chili’s as much as I used.

Before you prepare this, make sure to check the ingredients needed for this recipe. These spices are always available in Indian supermarkets.

Preparation time: 15 minutes

Cooking time: 35 minutes

Required appliance : Pressure cooker / Slow cooker

Blender/Mixer

Ingredients

Mutton with bones – 1 kg, cut into 3-inch chunks

Turmeric powder – 1/2 tsp

Ginger-Garlic paste – 1 tsp

Salt – 1/2 tsp

Ghee – 5 tbsp


For the masala paste

Kashmiri dry red chili – 10 (for red color, although it has a bit of heat)

Red chili powder – 2 tsp (depending on the spice level, you can skip this or add later in step-5)

Black peppercons – 1 tsp

Coriander seeds -1 tbsp

Star anise – 1

Cloves – 5

Cinnamon stick – 3 to 4 inch long

Cumin seeds -1 tsp

Fennel seeds – 1 tsp

Cardamom pods – 3

Garlic cloves – 5

Tamarind pulp, half the size of table tennis ball mixed in little water


Directions

1.To the cut meat, add turmeric, ginger-garlic paste salt. Mix together to coat the pieces and set aside for 10 -15 minutes.

marinating mutton before cooking

2. Meantime while the mutton is retained, prepare the masala paste.

Heat a small pan on high heat. Add the spices of dry red chili, peppercorns, coriander seeds, star anise, cloves, cinnamon, cumin,fennel seeds, cardamom (except for garlic & tamarind). Lightly toast them for 2 to 3 minutes.

mutton spice paste for dry frying

Then, remove the pan from heat.


3. Transfer the toasted spices into a small blender or mixer. Now, add garlic cloves, tamarind water and red chili powder. Grind into a fine paste. If necessary add some water and make a smooth paste.

Mutton Ghee Roast recipe ingredients

blending the spices


4. Cooking mutton:

Heat a pressure cooker on high with 2 tbsp of ghee. Add the mutton pieces and fry them for 1-2 minutes.

Mutton Ghee Roast recipe

Add 1/2 cup of water, not too much. Cover with the lid and the whistle. Take 6 whistles and turn off heat. Wait until the pressure is all gone before opening.

mutton in a pressure cooker

Taste the mutton to check for salt to add later.

mutton in a pressure cooker


5. Heat 3 tbsp of ghee in a wok or pan, add the masala paste, salt, and fry on high heat for 30 seconds (if you haven’t added chili powder earlier you can taste the spice level and add now).

Red spice paste for mutton ghee roast

Add the mutton pieces (if there is water, you can use it to make soup) without the water or fat content, and stir-fry the mutton to coat the meat pieces. Sprinkle curry leaves and stir-fry for 2-3 minutes until the gravy turns thick and roasted.

Mutton Ghee Roast

Mutton Ghee Roast with curry leaves

The longer you toss, its color changes and becomes more like a dry gravy. Serve piping hot with any rice recipe. It can also be served as a main course with bread.

Mutton recipe, ghee flavor


Thank you for visiting!

If you are unable to comment or subscribe to my posts drop me a message at delsweetaroma@gmail.com


Hover over the recipe and click for more related posts:

Soup of mutton bone-marrow


Stay Heathy!


Read More

Goli Baje Recipe

Hubby loves Goli baje’s, sounds funny, haha..Well, I came to know more of his tastes after getting married to him. And I love making them occasionally.

Goli baje (in Tulu, Indian cuisine) is a deep-fried tea-time snack popular in Mangalore-Udupi region. It is also known as Mangalore bajji or Mangalore bonda. Yes, my posts are often from Mangalore, being a Mangalorean myself they are served locally in restaurants for breakfast or evening tea along with a dip called chutney made of Coconut, coriander or others. Goli Baje’s have a unique taste with a smooth exterior and a spongy interior that suits well during the monsoon season. After few trials and errors I learnt the precise measurements to obtain a good texture. The texture also depends on the fermentation time and thickness of batter before frying. I have provided the precise quantity of all ingredients. The coconut-coriander chutney was just a perfect dip to enjoy it.

Preparation time: 10 minutes, plus 2 hrs fermenting time

Cooking time : 20 minutes

Makes: 25 – 30


Ingredients

Vegetable oil for deep-frying

Plain Flour / Maida – 1 cup / 150 g

Gram flour/Chickpea flour/Besan – 4 tbsp / 25 g

Yogurt – 1/2 cup / 160 g (thick)

Water -1/2 cup

After fermentation:

Ginger paste / fresh ginger – 1 tsp, chopped

Cumin seeds – 1/2 tsp

Green chili – 1 tsp / 1 small, chopped

Grated coconut – 2 tbsp

Caster sugar – 1 tbsp

Salt – 1/4 tsp

Baking soda – 1/2 tsp

Coriander (optional) – 1 tbsp, chopped

Warm water – 4 tbsp


For Coriander Chutney / Coriander Sauce (A dip that goes well with Goli Baje)

Fresh coriander/ Cilantro/ Chinese parsley- 25 g to 40 g, washed and roots removed (depending on quantity required)

Fresh grated coconut – 1/2 cup or as required (also, depending on quantity)

Salt – 1/4 tsp

Fresh ginger – 1 inch thick, small

Green chili – 3 small

Seasoning:

Vegetable oil – 2 tbsp

Red dried chili – 1 (if available)

Mustard seeds – 1 tsp

Curry leaves – 1 medium strip, washed & dried using towel (can use frozen)

Water as required for thickness


Directions

1. In a large bowl, to the the sifted plain flour, add chickpea flour, yogurt. Mix. Then add 1/2 cup water until well combined with no lumps in the batter.

chickpea flour, gram flour, besan added to maida, plain flour

curd added to Goli baje


2. Cover and set aside the batter in a warm place at room temperature for minimum 1 1/2 – 2  hours (I kept it for precisely  2 hrs). Even if it’s a little longer the better.

Goli baje batter of gram flour, plain flour, yogurt & little water


3. After 2 hrs: Add ginger, cumin, green chili, coconut, sugar, salt, baking soda (you can add coriander now if your using). Mix and add water to form a thick batter until there are no lumps (not too runny). Set aside for 5 minutes.

cumin seeds, grated coconut, ginger paste, salt, green chili, sugar, baking soda

4. Heat a container with oil on medium-high. Drop a pinch of batter, if oil is hot enough it will form bubbles around the batter and sizzle.

browning on one side of Goli baje

5. Take tablespoon of the batter, scoop it in your fingers and drop it in small amount into the hot oil. Do not overcrowd. In a few seconds flip to brown on the other side. Fry in batches.

Goli baje, Mangalorean bonda, Indian

Once they have turned brown, drain them on paper towels using a stainless steel slotted spoon (reduce heat to low while removing to prevent over browning). Serve hot with fresh coriander chutney.

goli baje with coriander chutney


Coriander chutney: Preparation time – 7 mins to 10 mins

1. In a blender add coriander leaves, coconut, ginger, salt, green chili and a little water. Blend until smooth paste.

2. Heat oil in a small deep bottomed, stainless steel container on medium. Add mustard seeds, it’ll start splitting. 

Coriander chutney, mustard seeds sputter

3. As the mustard seeds sputter add red-dried-chili and curry leaves. Reduce heat and toss for 5 seconds. Make sure not to burn.

mustard seeds, red dried chili, curry leaves

4. Now, add the coriander paste from the blender. Mix and let it boil over low heat. Add water depending on your choice of consistency for thickness.

Coriander chutney for Goli baje

Goli Baje with coconut-coriander chutney

Storage of Chutney:

+Store in an airtight container in the fridge or can also be frozen. Must be used within 2-3 days if stored in the fridge.


Note:

*I haven’t used coriander in the Goli Baje batter.

*If you do not have coriander for the chutney, substitute it with additional coconut to prepare a coconut chutney.

*While removing the goli baje from oil after it has turned brown, reduce heat to prevent burning.

*If the batter is too water you can add more plain flour/maida.


I would love to know how it turns out for you. Thank you for visiting 🙂


Stay healthy!

Read More