Happy New year to my lovely readers. I have noticed several readers on my posts over the past few weeks. Knowing that there are many who want to cook amazing recipes motivates me to share. Today’s recipe, my first post of 2018 is the best pork steak you will ever have. A quick, simple and delicious dinner I made under 45-minutes.
We started off this year with a hit recipe that is drool worthy. The pork steak after baking was nicely roasted with its juices full of flavor and taste. The combination with a healthy salad and corn is definitely something that one should always have. Its very simple to prepare especially during weekends for a large group of people. You can also add some rice to the serving if you like.
Preparation time: 10 minutes
Cooking time: 40 minutes
Serves: 2
Ingredients
Pork Collar / Loin Chops boneless – 500 g
Garlic cloves – 4 large, finely chopped
Red Chilies – 2, I used birds eye Chili, Reseeded and finely chopped
Sweet Chili sauce – 2 tbsp
Paprika powder – 1 tbsp
Soya sauce – 2 tbsp
All-spice powder – 1/2 tsp
Sweet Corn or Corn on cob – 1, husk and threads removed (depending on serving part)
Salt – 1/2 tbsp
Mixed salad – large pack
Tomato – 1 small, finely chopped
Cesar salad – 1 tbsp
Garlic & Chives Cheese / Goats cheese – 1 pack, cut into few chunks
Directions
Mix the sweet Chili, paprika powder, and soya sauce in a small bowl. Add the all spice powder, chopped garlic, and red Chili as well.
Spread the mixture over the pork chops to coat well. Set aside for 15 minutes.
Meanwhile, preheat the oven at 200 degrees Celsius / 390 degrees Fahrenheit / Gas Mark 5. Do this for 5 minutes or until it has reached the temperature.
2. Place the pork chops on a baking sheet over a lower rack if you’re using a convection oven. Alternatively, place them on the oven rack in the Center if you are not.
Bake on convection mode for 30 minutes or until cooked through. Then, turn sides and bake for another 5 minutes. This will give a nice brown roasted texture.
Preparing the Salad:
3. Wash the salad thoroughly with your hands under tap water. Transfer it to a bowl containing chopped tomatoes, garlic, and chives cheese. If you think the leaves are too large just break them by tearing apart, drizzle salad dressing, mix and enjoy!
Preparing the Corn: I prefer it hot while serving. So, I made this in the end when my pork steaks are only 10 minutes from being done.
4. Meanwhile, take a large flat bottomed pot with 3/4 full of water. Make sure the pot is large enough to immerse the corn in the pot Completely. Add 1/2 tbsp of salt and bring the water to a boil on high heat.
Using a pair of tongs, gently place the corn in boiling water and reduce the heat to medium-high. Do not worry if it floats as it boils it rotates and cooks. Cook for 8-10 minutes. To be sure, I poked it with a fork to check if it was cooked.
You can season with pepper, butter or cheese or have it plain seasoned with salt.
To know more about me drop by or share your experience in comments below. Thank you for visiting!
This fruit cake can be made anytime during the year. It is especially useful if you need to bake a cake at the last-minute and have not much time. I baked 2 fruit cakes this Christmas. One was a last-minute cake to give as a gift to my Neighbor and relatives. The other was a traditional brandied Christmas cake.
I put a lot of time and thought into planning my recipe for both the cakes weeks before Christmas. It was worth the effort. Someone asked if the cake was store-bought. I was happy to tell them that it was, in fact, homemade!😇. I feel motivated to post more recipes here when I get good compliments on my recipes. I credit everyone of you for making this happen. Please share your thoughts. Tell me how you spent your Christmas this year. Leave a comment below if you can spare a minute of your time.
Thank you and have a Happy New Year! 😊💫☃
Preparation time: 20 minutes
Cooking time: 1 hr 10 minutes
Need: 20 cm / 8 in round deep cake tin or spring-clip tin greased and lined (or use a ready made cake liner)
Ingredients
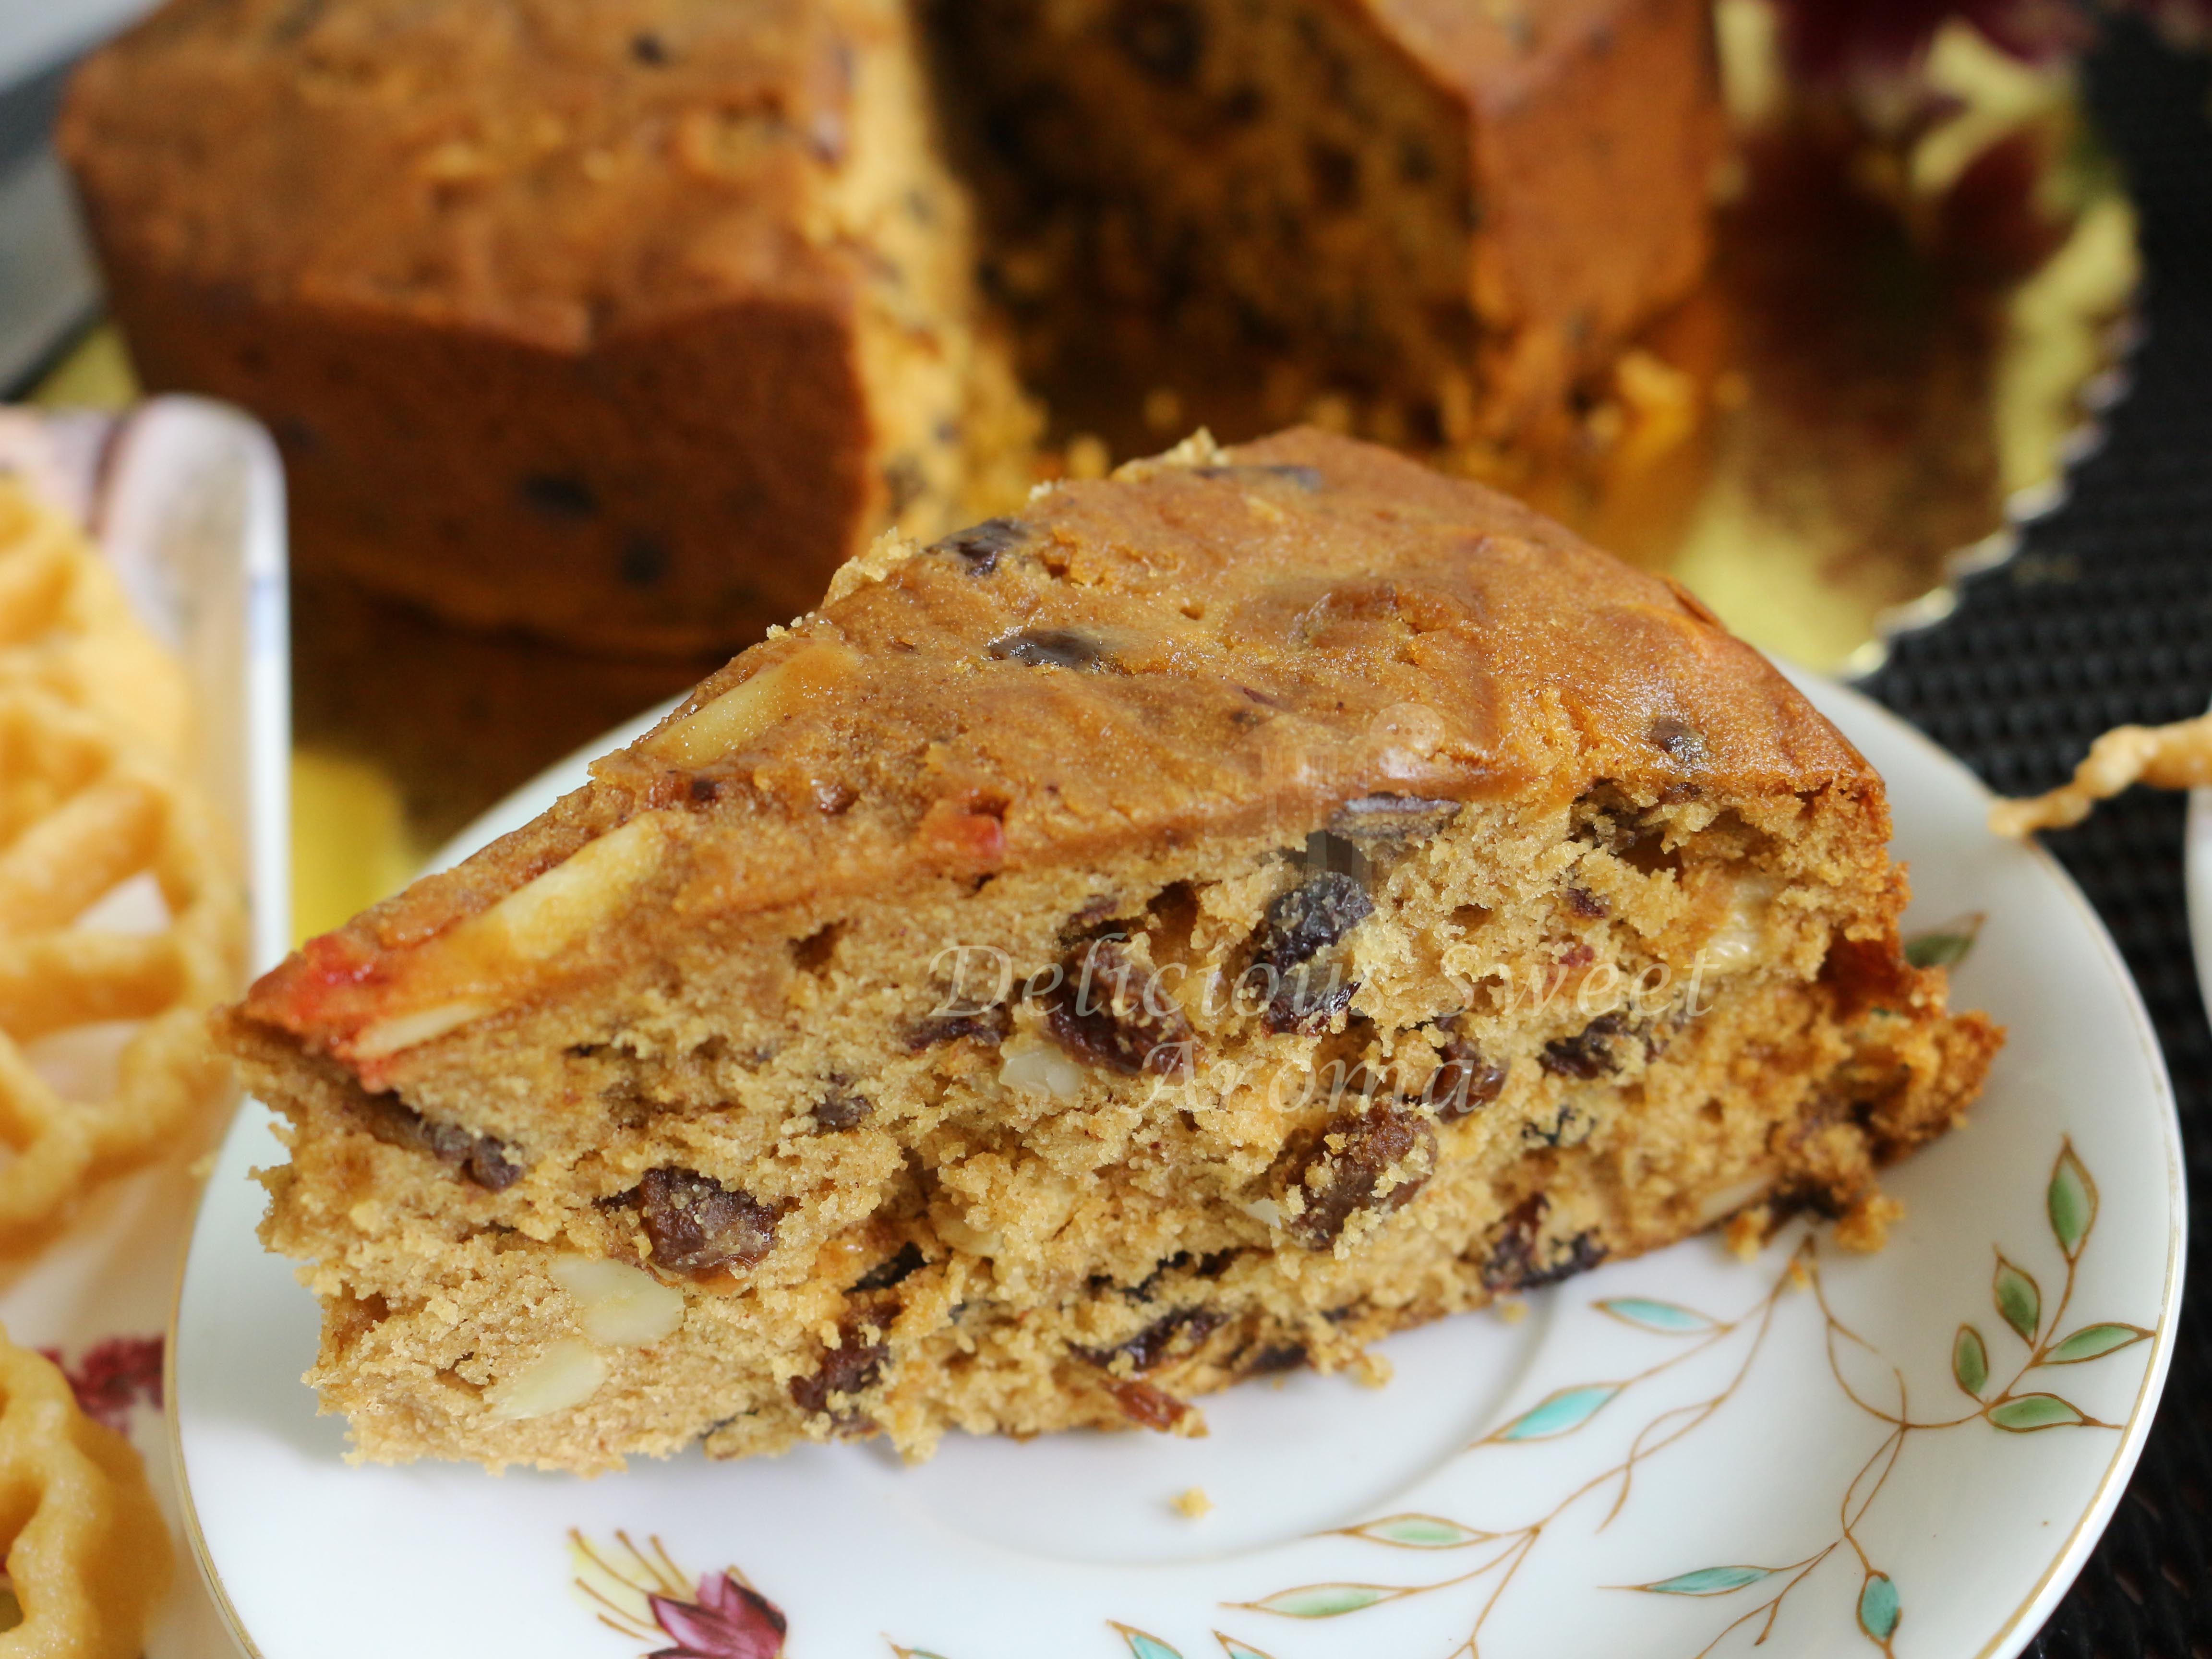
Dried Fruits: Raisins – 100 g
Black currents – 20 g
Candied Cherries – 10 pieces, halved
Orange juice – 3/ 4 cup, of 2 large oranges
Unsalted butter, softened – 200 g + extra for greasing
Brown sugar (fine) – 200 g / 1 cup
Plain Flour / Top flour – 225 g
Large whole eggs – 4, at room temperature
Vanilla Essence – 1 tsp
Baking powder – 1 tsp
Ground cinnamon – 1 tsp
Nutmeg – 1 tsp
pinch of salt
Nuts:
Cashew nuts – 70 g, chopped
Almonds, slivered – 20 g
Directions
Place the dried fruits like raisins and currants together with cherries, orange juice into a deep pot. Bring it to a boil on high heat. Turn on the heat and simmer for approximately 15 minutes.
Leave it to cool or if you have time leave it overnight or as long as you can. Coat the nuts in 3 tbsp of all-purpose flour and set it aside.
Preparing the baking tin:
2. In the meantime or on the day of baking, butter a 20 cm round cake tin. Then line both the bottom and the sides with baking paper. Make sure the paper peaks over the top by about 5 cm.
Butter again the base and the sides. Set aside.
Preparing the cake mixture:
3. In a large bowl, combine sugar, butter, flour, eggs, and vanilla. Then add baking powder, cinnamon, nutmeg, and salt except for dried fruits and nuts.
Start by mixing with a wooden spoon to combine everything gently. If you use a hand mixer too soon, it can cause the flour to scatter. This will create a mess.
Now use the hand mixer and make sure to mix everything really well, around 1.5 – 2 minutes on medium speed. Once its mixed well enough, detach the beaters from the hand mixer and remove any cake batter on it.
4. Add the dried fruit mixture along with its syrup. Mix with the wooden spoon. Then mix in the nuts coated in flour. Give a good mix.
Preheat the oven to 140°C/Gas Mark 1 or for 10 minutes.
5. Spoon the cake mixture into the cake tin. Level the top using a spatula. Bake in the Center of the oven for 70 minutes.
If using a convection oven, place it on the lower rack. Check once after 45 minutes.
It is cooked when a wooden skewer inserted into the middle of the cake comes out clean. I do this without removing the cake tin out of the oven. Do not worry if it has turned light brown on top and needs more time to cook.
If the top turns dark brown in color before it’s cooked, cover it with parchment paper.
Leave the cake to cool completely in the tin. If you wish to decorate the cake you can do so after its completely cooled.
Packing as gift. Forgive me for my bad photography skills.
A Traditional Christmas cake is steeped in brandy and dried fruits imparting lovely aroma. An easy plum cake recipe that I made for the first time without any hassle of too many ingredients. It’s simple and can even be baked by a beginner.
The process begins weeks in advance. Dried fruits are soaked slowly in rich, fragrant brandy. They absorb every drop of warmth and flavor. As the days go by, more brandy is lovingly added to the cake. This deepens its taste and creates a moist, dense texture that melts in your mouth.
Baking the cake is an event in itself. The house fills with the comforting aromas of spices like cinnamon, nutmeg, and cloves. These aromas mingle perfectly with the sweet scent of caramelized fruit. On Christmas day, unwrapping the cake is almost like unveiling a treasure its glossy, brandy-infused exterior shining with festive promise.
Sharing this cake isn’t just about indulgence; it’s about tradition, memories, and the joy of togetherness. Each bite carries the warmth of family stories, laughter, and the spirit of the season. The brandy Christmas cake is a delicious centerpiece of holiday cheer.
Dried fruits (soaked a day in advance, *see notes):
Dates pitted, roughly chopped – 90 g
Raisins – 110 g
Black currant – 70 g
Cake mixture:
Brandy / Rum – 100 ml + extra for feeding the cake (*see notes)
Unsalted Butter ( soft) – 200 g + extra for greasing the pan
Dark brown Sugar (fine) – 1 cup / 200 g
Vanilla extract – 1 tsp
Honey – 2 tbsp
Lemon Zest – 1
Top Flour / Plain flour (All-purpose flour) – 225 g
Baking powder – 1 tsp
Cloves – 1 tsp / 5 pcs (powdered see notes*)
Ground cinnamon – 1 tsp
Nutmeg – 1 tsp
Pinch of salt
Large whole eggs – 4, room temp
Cashew nuts – 1/2 cup or 75 g, chopped
Almonds, slivered – 20 g
Directions
Chop the dried fruits. Soak them in a mixing bowl with brandy or rum.
Cover the bowl with cling film. Leave it for 24 hours or a week, stirring occasionally in a cool place.
The next day or after a week:
2. Add 2 tbsp of all-purpose flour to the cashew nuts and almonds, mix together. This in done so that they do not sink to the bottom of the cake. Reserve for later. Prepare the rest of the ingredients.
Grease and line a 20 cm (8″) cake tin base with a circular cut parchment paper. Cover the greased circumference with a layer of baking parchment paper. Make sure the paper is few inches above the level of tin.
Preparing the Cake Batter:
3. Cream together butter and sugar until light and fluffy using a electric hand mixer. Stir in the honey, vanilla extract, zest of one lemon and mix well with the hand mixer until well mixed.
4. Sift the flour, baking powder, cloves cinnamon, nutmeg along with salt. To avoid any face full of flour, mix with a large spoon initially. Then use the electric hand mixer to mix and combine.
5. Add 2 eggs first. Beat the eggs and mix well for 30 seconds on low speed. Wait until you add the next one. Repeat until all are done.
6. Add the dried fruits and left over liquid. Mix them in well. Then stir in the cashew nuts. Finally, add the almonds.
7. Preheat the convection oven at 140 degree Celsius (275 °F / Gas mark 1). Spoon the batter into the prepared cake tin and smooth the tops.
For a convection oven, place the cake on a lower rack. Make sure there is more than a 2-inch gap from the parchment paper to the top.
Bake for 1 hour and check with a wooden skewer for doneness. Bake for another 15 minutes or until the skewer inserted into the middle of the cake comes out clean. You need to cover the top of the cake with a round parchment paper. Do this if it is getting too brown before the cake is fully cooked.
I prepared this late in the evening hence the indoor lighting.
8. Leave the cake to cool in the tin completely. Remove the parchment paper from the sides.
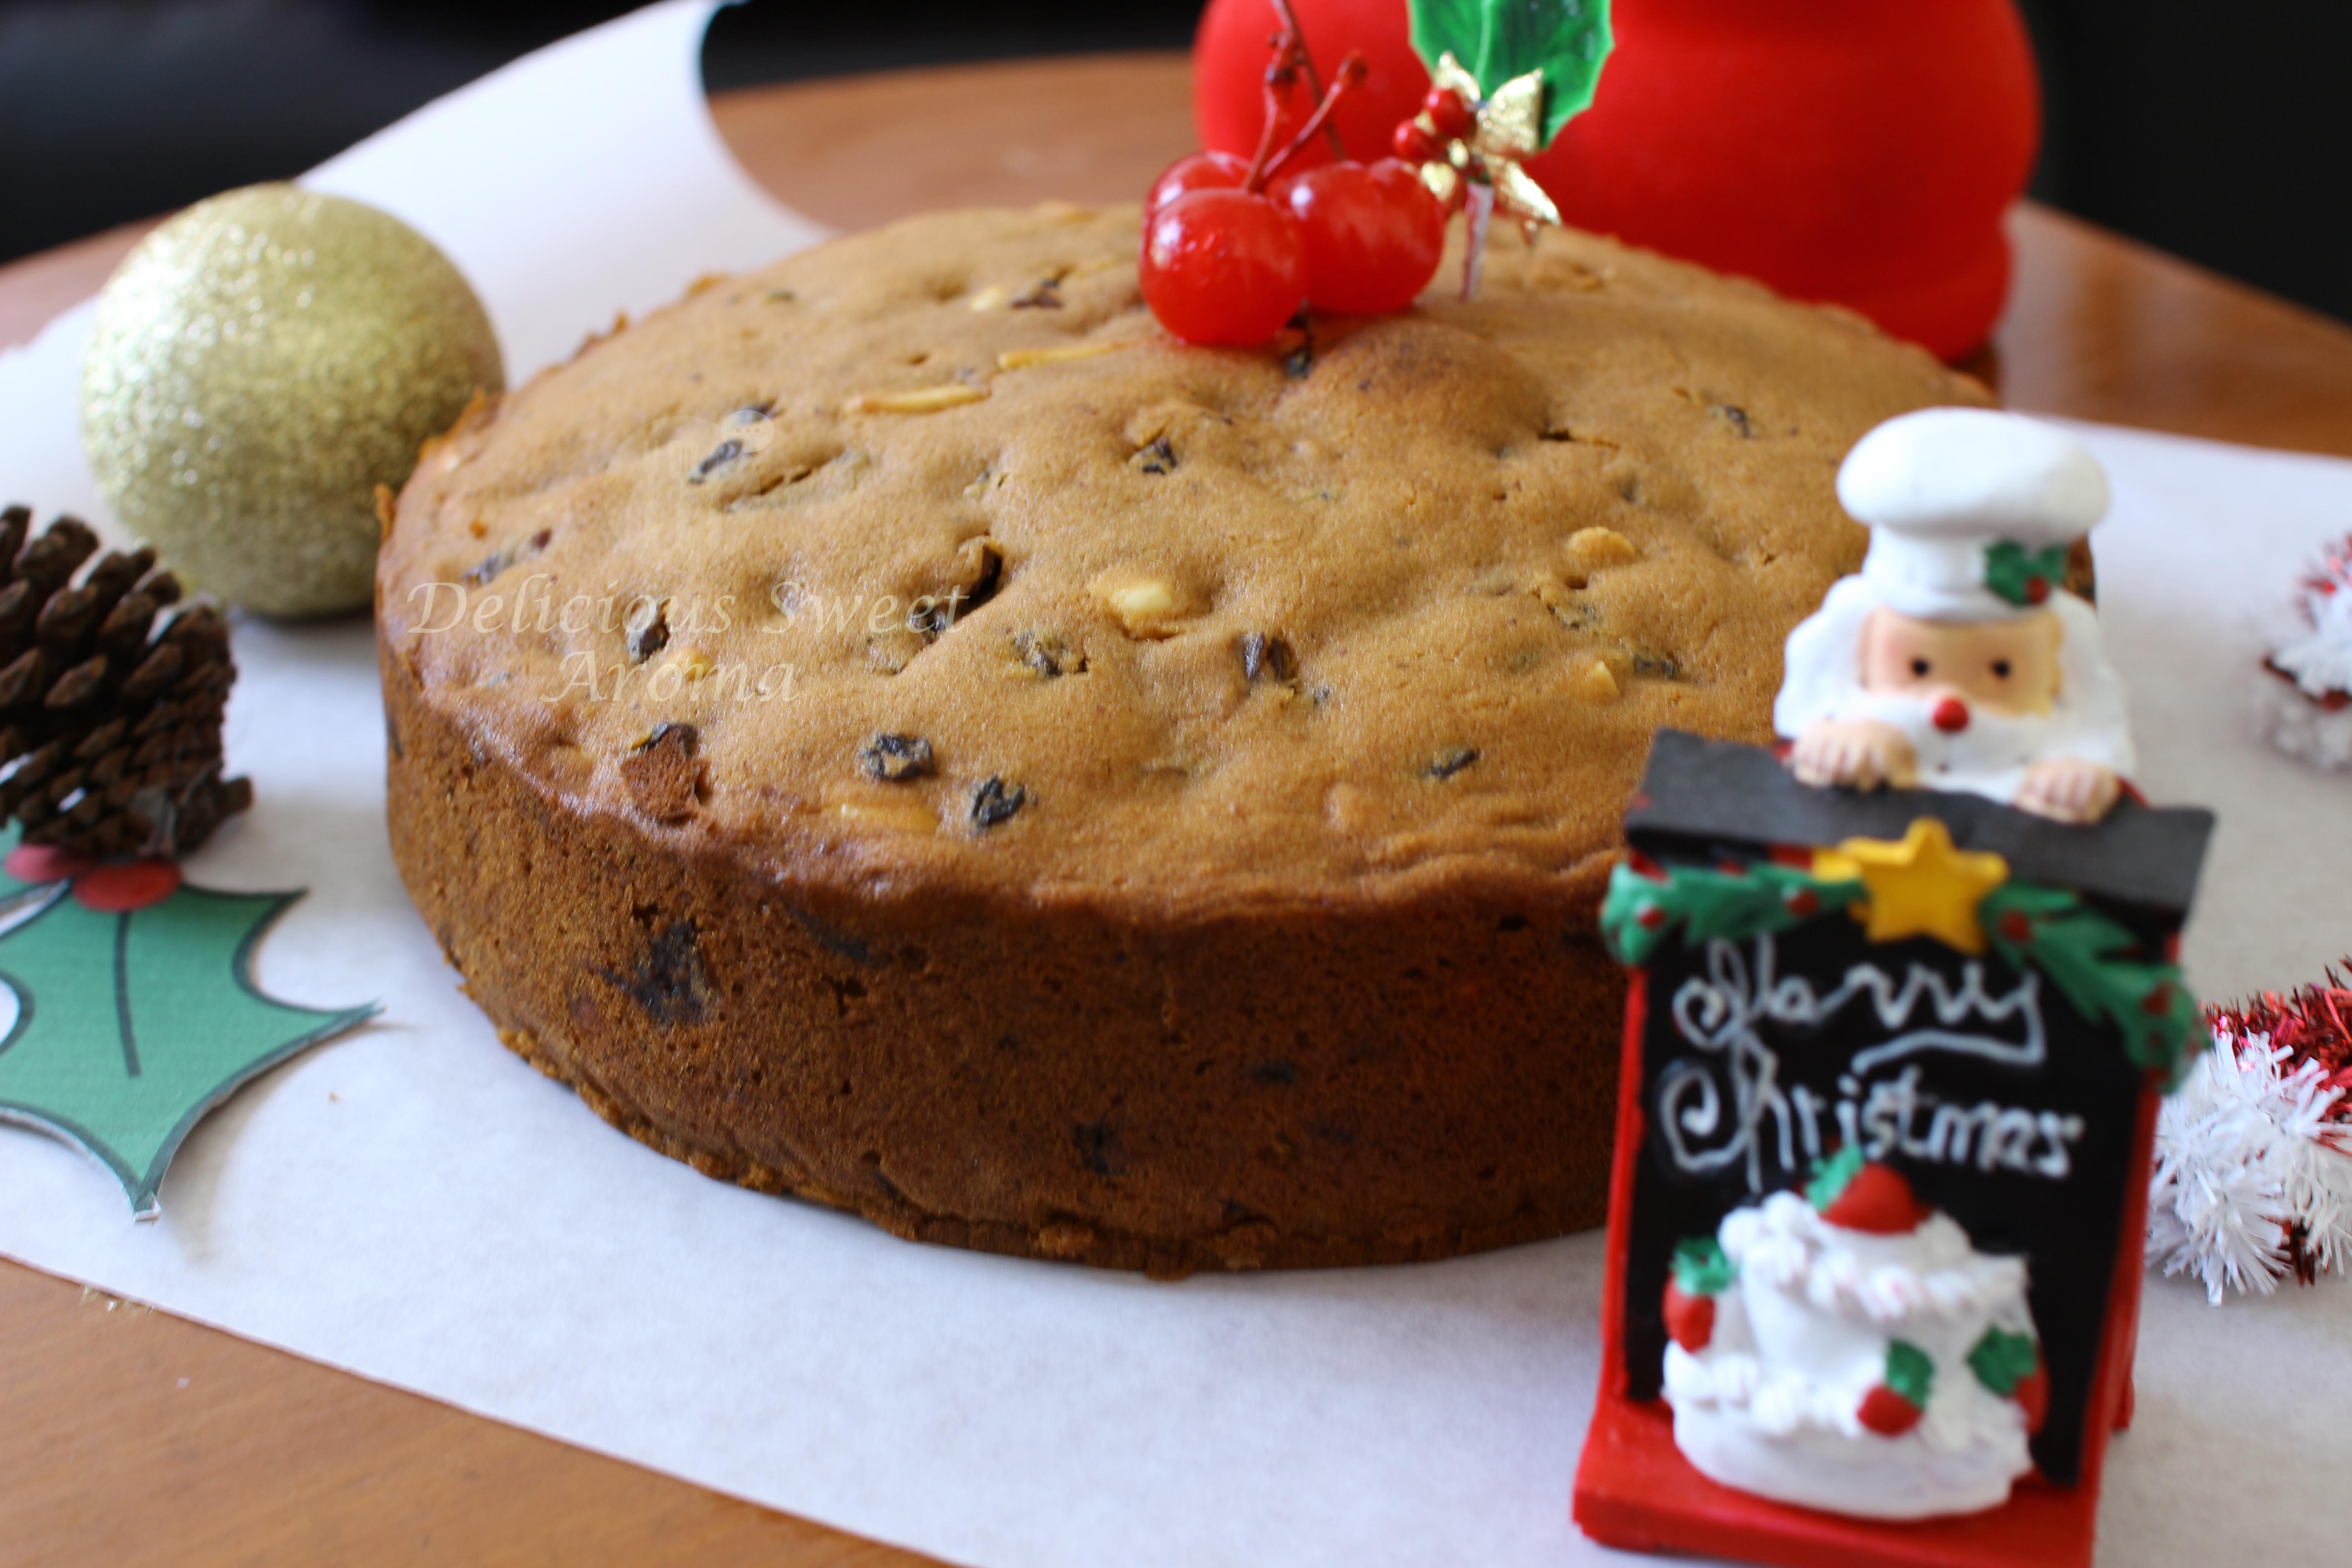
Tada!! That’s beautifully done with fantastic texture and gorgeous color. We were so tempted 😍. Right now, we just can’t wait for Christmas to grab a bite. We want to try it out.
For Feeding the cake:
Pierce the cake with a toothpick and drizzle 2 tbsp brandy over the cake. Quickly wrap it with double baking paper sheets and the final layer with Aluminum foil. Store it in a cool place in a plastic bag and place it in a sealed airtight container.
If you have prepared the cake weeks in advance feed the cake with alcohol every week.
Notes
I soaked the dried fruits with brandy for a week. You can also soak it overnight. Alternatively, soak it the day before baking.
In case you do not find cloves powder: Take 5 pieces of cloves. Place them in a small zip-lock bag. Pound them to make a powder. You can also use a mortar and pestle.
If using Rum: I used STROH rum, known for its bold 80% alcohol content. I carefully diluted it with an equal amount of water. This method creates the perfect balance of rich flavor for my Christmas fruit cake.
The subsequent brandy was also used for this cake. If you do not wish to use alcohol replace it with orange juice.
Hey everyone! I’m sharing an update on my Brandied Plum Cake. I’ve been feeding it for a few days. I finally unwrapped it this Christmas week. So exciting! 😇 . While unwrapping the cake from the foils and butter paper we get the lovely aroma of brandy.
The amount of brandy I used was just right. It was not too much and not too less. Hope you all are enjoying your holidays😊. Here are a few pics taken on Christmas day. My husband and I sat all morning enjoying our homemade Christmas treats. It felt just like we do in our hometown. How did you spent your Christmas this year?
Thank you for dropping by Delicious Sweet Aroma. Additionally, do not forget to check for updates on my YouTube here 👉 ‘Delicious Sweet Aroma
Wishing you a joyous holiday season 🤩🎅☃ with peace and cheer in the New Year!❤🎶🎀🎁🎉
A fruit cake soaked in rum or brandy, combining rich, spiced fruits with the deep, warming flavors. The alcohol enhances the cake's moist texture and allows the flavors to mature, making it a perfect festive dessert enjoyed by many during the holiday season.
200gButtersoft unsalted plus extra for greasing the pan
200gDark Brown Sugarfine
1tspVanilla Extract
2tbspHoney
1Lemon Zest
225gAll-purpose flour
1tspBaking powder
1tspCloves powder
1tspGround cinnamon
1tspNutmeg powder
4EggsLarge at room temperature
pinch of salt
Dried Nuts
75gCashew nuts
20gAlmondsslivered
Instructions
Prepare the Dried Fruits
Chop the dried fruits and soak them in a mixing bowl with brandy or rum and cover with cling film.
Leave it for 24 hours or a week, stirring occasionally in a cool place.
Prepare the Nuts
Add 2 tbsp of all-purpose flour to the cashew nuts and almonds, mix together. This in done so that they do not sink to the bottom of the cake. Reserve for later. Prepare the rest of the ingredients.
Grease and line a 20cm (8″) cake tin base with a circular cut parchment paper and also the greased circumference with a layer of baking parchment paper. Make sure the paper is few inches above the level of tin.
Cream Butter ad Sugar
In a large bowl, beat together the softened butter and brown sugar until light and fluffy.
Stir in the honey, vanilla extract, zest of one lemon and mix well.
Mix Dry Ingredients
Add flour, baking powder, cinnamon, nutmeg, cloves, and salt.
Combine Eggs
Add the eggs one at a time, mixing well after each addition.
Preheat Oven
Preheat your oven top -Bottom heat to 140°C (275°F/Gas mark 1) . Grease and line a 9-inch round cake pan with parchment paper.
Combine Fruits and Nuts
Stir in the soaked dried fruits and then the chopped nuts.
Bake
Pour the batter into the prepared cake pan and smooth the top. Bake for 1 hour 15 minutes or until a toothpick inserted into the center comes out clean.
Soak with Rum:
Once the cake is done, remove it from the oven and let it cool. Then, remove the cake from the pan and transfer it to a wire rack. Brush it generously with more rum or brandy.
Wrap and Rest:
Once the cake has cooled completely, wrap it in plastic wrap and let it rest for at least 24 hours to allow the flavors to meld. For an even richer flavor, you can feed it with rum every few days.
Notes
For an extra moist fruit cake, you can soak it in rum for several weeks before serving.
Use high-quality rum for the best flavor.
Enjoy your rich, flavorful rum-infused fruit cake!
Keyword Boozy Fruit Cake, Christmas Fruit Cake, Rum Fruit Cake
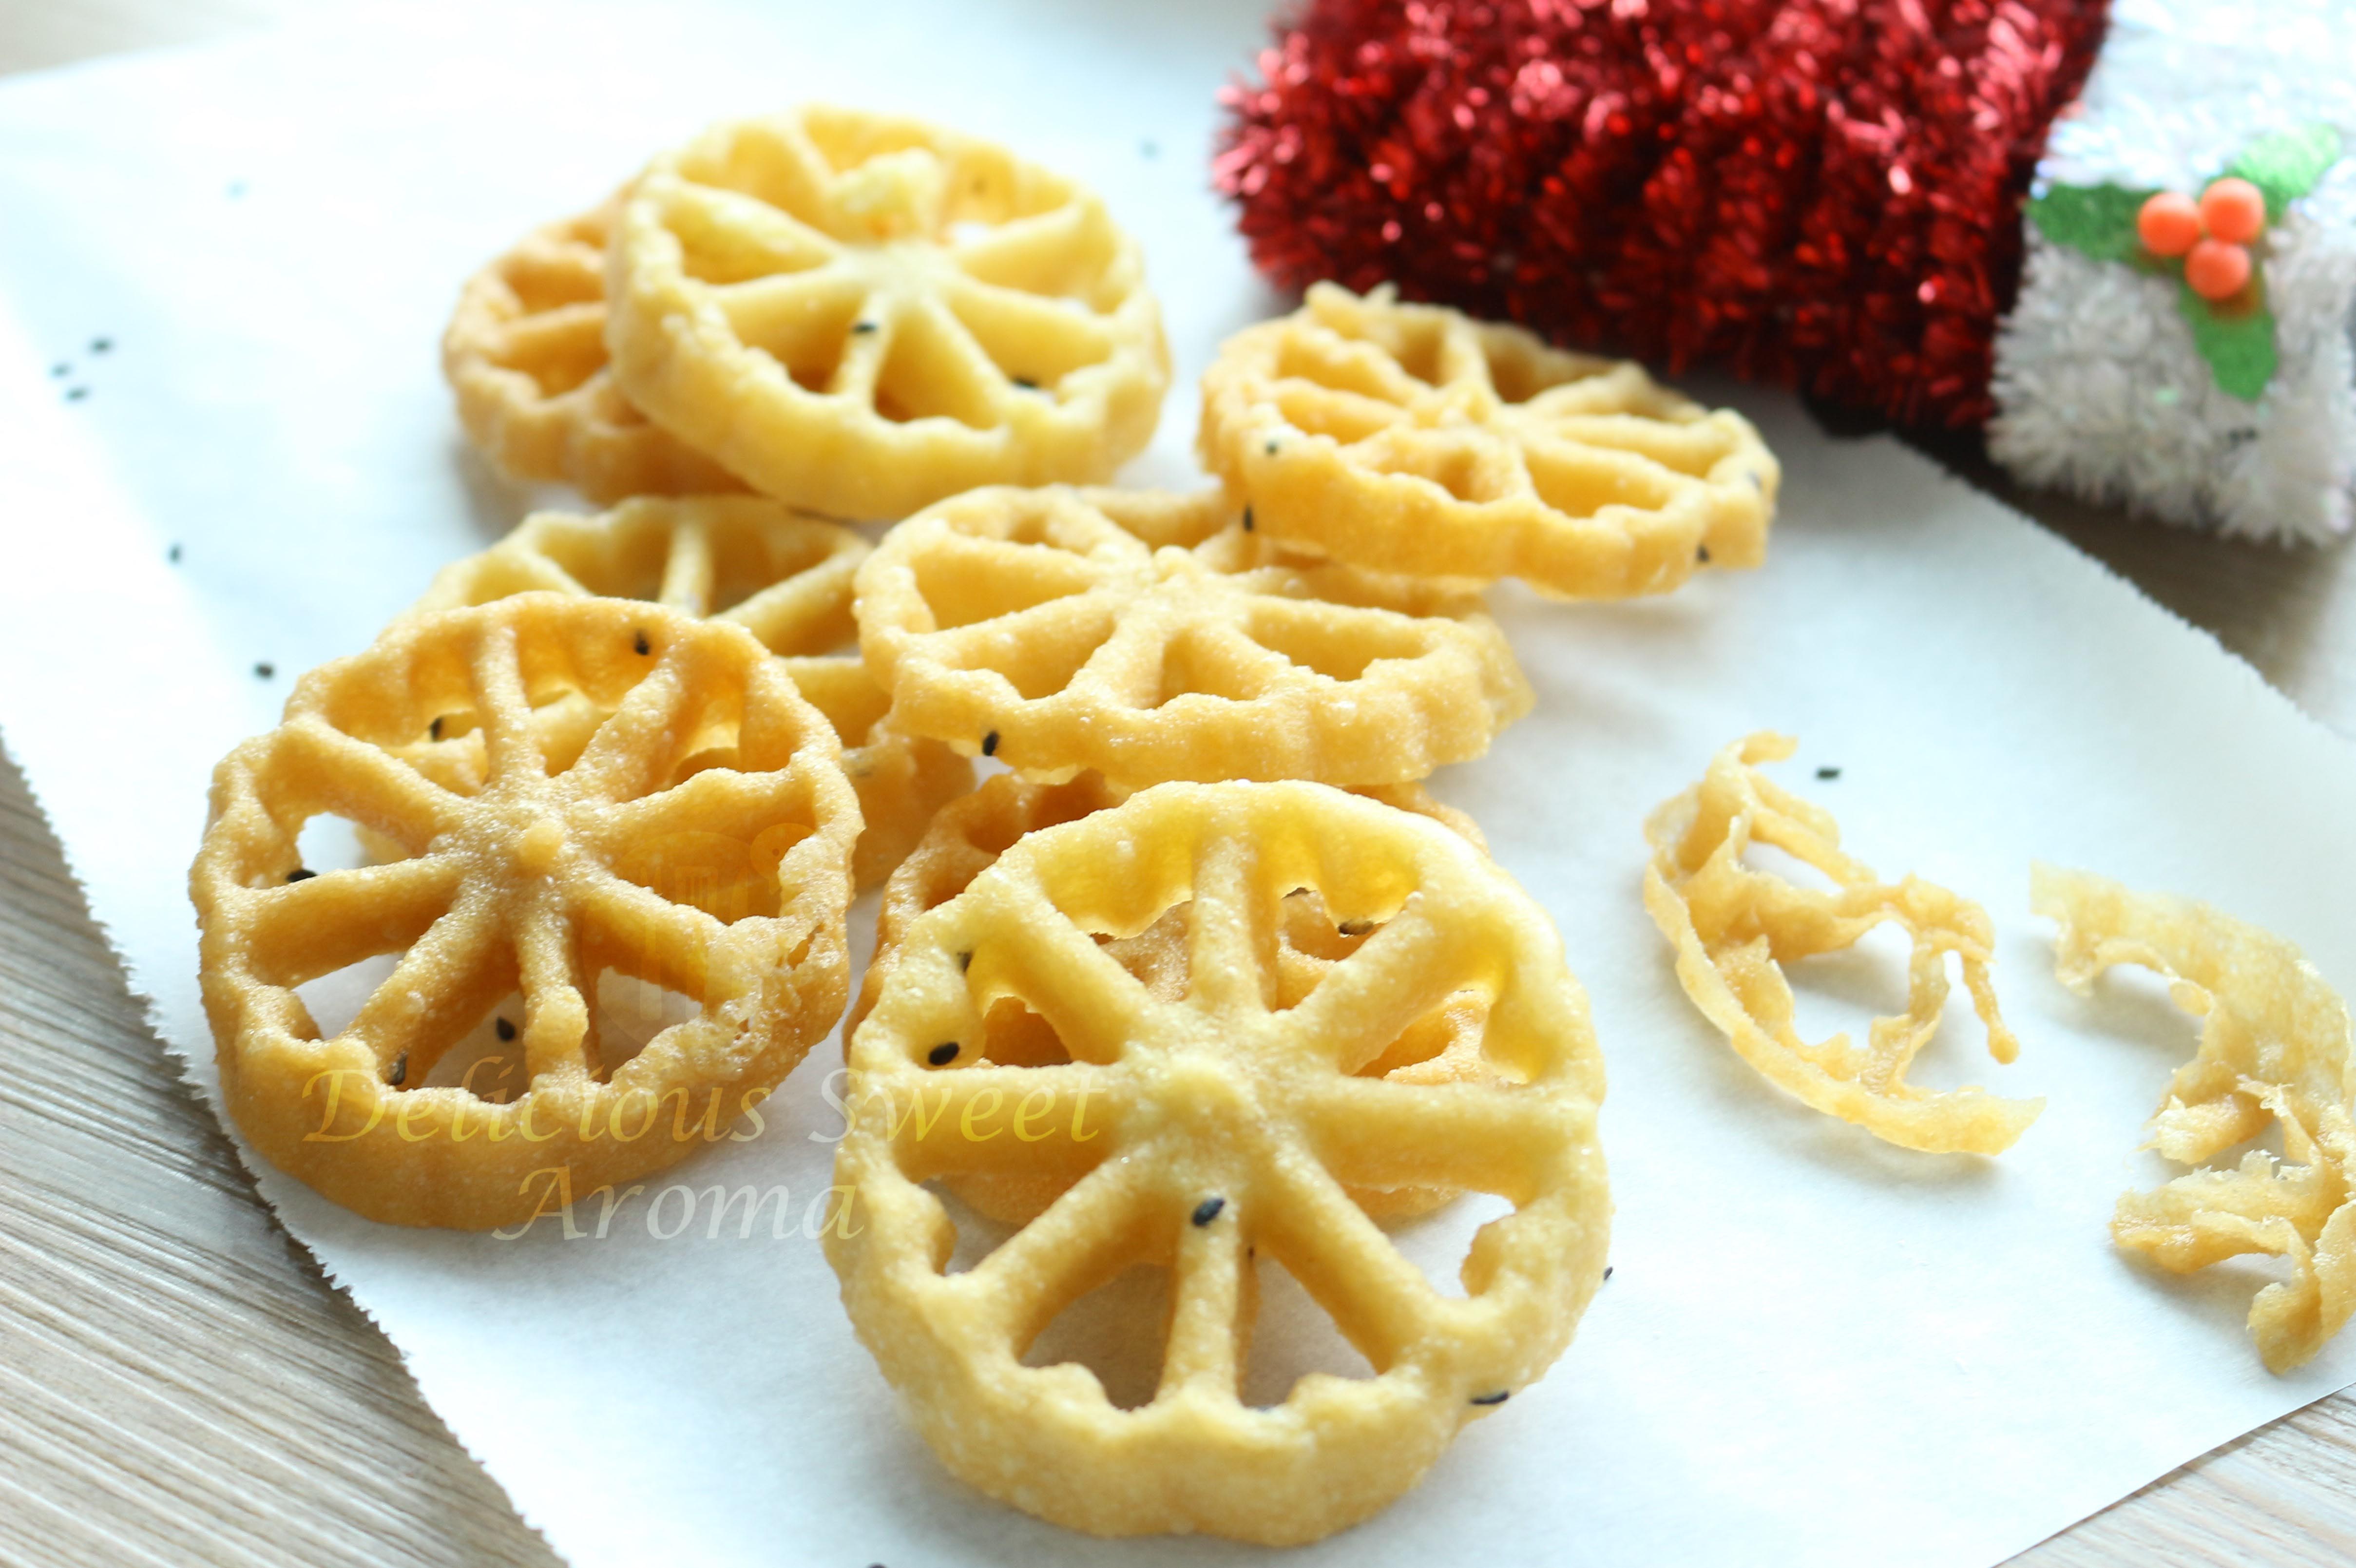
Rose cookies are traditionally prepared before New Year in South-Indian Christian households. They are always available in Mangalore supermarkets during Christmas. There, you can find varieties of other crispy and savory Christmas snacks.
Kokis are made using a special round iron mould. The mould is in the shape of a flower with a long handle to hold. This is called ‘kokis achchuwa.’ I bought it from Mangalore the last time I visited home. I have seen a few different designs of moulds here in Singapore. They can also be used to make kokis. In Mangalore, we call it Kokkisan (or kokis). It is called Rose cookies because of its rose-shape. In various regions, it is named differently. In Scandinavia (Swedish or Norwegian), it’s called Rosette cookies. It’s known as Achu murukku in Tamil and Achappam (Malayalam) in Kerala. Similar mould is also available on Amazon Rose cookie mould.
Rose cookies are not baked. They are deep-fried from either freshly ground rice grains or rice flour batter. These contain coconut milk, sesame seeds, and egg. Some recipes use other extra spices to make savory varieties. It might get a bit tricky at first. Once you get a hold of how it works with the batter and the mould, it is very easy. If you prepare with rice grains, make sure to get the Kerala idli rice. These are usually available at Indian stores. Make a thin batter with the other ingredients mentioned below.
How to use a new cookie mould?
Wash the cookie mould with soap and then, applied oil to the mould 2 hrs prior to doing the following :
Drop the mould completely submerged in oil. Keep it dipped in oil until hot.
Once the mould has heated in hot oil, remove it. Promptly dip the mould in a bowl of water at room temperature. You will hear it sizzle.
Tap dry of any moisture on the cookie mould. Continue with step 3 (under step-by-step pictures) until it gets heated on medium-low heat.
Tips to prepare rice paste
Soaking – Rinse the rice with running water until the water runs clear. Transfer to a large bowl and add enough water to cover it. Cover with a lid and let it soak for 4.6 hours. The soaking process softens the rice and makes it easier to grind into a smooth batter.
Grind the batter – After soaking, drain the water from the rice. Using a mixer jar or blender grind the rice into a smooth batter with some water (approx. 1/2 cup). The lesser the water the finer the paste. But make sure the blades keep moving.
Consistency – The batter should have a thick yet pouring consistency. To achieve the right texture add water as needed.
How to make Rose Cookies with step-by-step pictures
1. Take the bowl containing rice paste, add salt, sugar, sesame seeds and mix. Pour coconut milk and the egg. Stir to combined together to make a thin batter of pouring consistency.
2. Add more coconut milk if the batter is very thick. The batter must be of pouring consistency (*see notes). Reserve until your ready with next step.
3. Heat a heavy bottomed container with enough oil up to 3-inchs to submerge the mould. Place the mould in oil completely covering the whole mould till the top.
4. When the mould is heated, you will know it is radiating heat. Place your palm a few inches away from it to feel the heat. Be careful not to touch it.
Dip the mould in the batter making sure the sides are 3/4 covered in batter (see picture below). Hold steady in the batter for minimum 10 seconds and not less (it is important because otherwise it will form a shape in the batter itself and batter will not cling to the mould). Video clip here
5. After 10 seconds immediately place the batter covered mould completely dipped in hot oil to deep-fry (induction #6). You will see the oil bubbling. Hold it in oil for at least 10 seconds. Then gently shake the mould to release the cookies.
If not, It should loosen up in 30 secs to 1 minute from the mould. You could also use a wooden skewer to release it from the sides.
6. Meantime, leave the mould in hot oil for a few seconds. Wait until you are ready for the next cookie. Then continue with step 4. Depending on the size of the container used you can fry more than one but just make sure you have enough space to dip the mould after each cookie (*see notes).
7. Flip them with the wooden skewer to fry evenly until light brown color on both sides.
8. Remove the fried ones and place them on kitchen paper towels. Repeat from step 4 until all the batter is used.
Leave them to cool completely before storing them in an airtight container or airtight storage bags.
Rose Cookies with rice | Mangalorean Kokisan | Achu Murukku
Indulge in the delightful world of South Indian sweets with Rose Cookies, also known as Kokisan. Perfectly balancing sweetness and sophistication, Rose Cookies are not just a snack; they are a cultural celebration that captivates both the palate and the heart.
Drain the water and transfer it to mixer grinder jar.
Grind to a smooth batter adding some water as required.
Transfer the batter to a large bowl.
Add salt, sugar and sesame seeds and mix. Pour 1/2 cup coconut milk and 1 egg. Stir to combine together.
Add some water if required if its thick to make it pouring consistency.
Heat a heavy bottomed container with enough oil upto 3-inchs to submerge the mould. Place the mould in oil completely covering the whole mould till the top.
When the mould is heated you will know when it radiates heat by placing you palm few inches away from it (careful not to touch it)
Dip the mould in the batter making sure the sides are 3/4 covered in batter (see picture below). Hold steady in the batter for minimum 10 seconds and not less (it is important because otherwise it will form a shape in the batter itself and batter will not cling to the mould).
After 10 seconds immediately place the batter covered mould completely dipped in hot oil to deep-fry (induction #6). You will see the oil bubbling, hold it in oil for at-least 10 seconds then gently shake the mould to release the cookies.Use a wooden skewer to release it from the sides.
Meantime, leave the mould in hot oil for few seconds until your ready for the next cookie and continue with step 4. Depending on the size of the container used you can fry more than one but just make sure you have enough space to dip the mould after each cookie.
Flip them with the wooden skewer to fry evenly until light brown color on both sides.
Remove the fried ones and place them on kitchen paper towels. Repeat from step 4 until all the batter is used.
Leave them to cool completely before storing them in an airtight container or airtight storage bags.
Notes
Make sure not to overheat the oil. You can keep the oil on medium-low heat (induction 5 or medium-low) if your preparing it for the first time . It might be hard to release the batter from the mould if overheated.
If the batter is too thin you will know it once you prepare the first two cookies, since it tends to be very fragile and breaks off easily. And, the hot mould will need to be immersed in the batter for longer than 10 seconds for thinner batter.
For deep-frying I used a flat deep-bottomed 7.5-inch / 19 cm wide container that could fry 3 cookies at a time.
While dipping the mould in batter, tilt the bowl for even coating.
If its too much batter to make at one-time. You can separate and use half the batter and keep the rest in fridge. I used half the rice paste for one-time which made 25 cookies, while the rest of the rice paste I stored it in the fridge for next day.
Keyword Achu Murukku, Crispy Rose Cookies, Indian Festival treats, Kokisan, Moulded Cookies, Rose Cookies, Traditional Indian Snacks
It’s December! Yay!! A season to be jolly and be crafty to celebrate Christmas. Making window decals with colorful snowflakes is an exquisite way of decorating your home.
For me a snowy Christmas is such an amazing feeling since most of my life I have lived in a tropical climate and snow during Christmas is SO MAGICAL!! In Singapore I don’t get to experience a snowy winter which makes it incomplete without a few flakes of snow. Custom made snowflakes from glitter glue is indeed fun anytime. It can be made into any shapes and designs you like and let it dry overnight. Get your kids into making these and hang them on windows and they will love it. They can be removed, re-positioned and reused for next year as well. So what are you waiting for?
1. Place a equal size wax paper over the template design A4 sheet and secure the ends with tiny tapes. You could also use zip-lock storage bags instead of wax paper or clear surfaces that are able to bend to peel them easily later.
2. Give a light shake to get rid of any bubbles in the tube. Squeeze the paint and start tracing the snowflake making sure the lines are thick and touching without any gaps or bubbles.
3. Once all are traced, simply let them sit overnight or for a day until they are completely dry. Drying time depends on the thickness of paint used so the time taken may vary.
If your making ornaments of shapes in round it might get a bit tricky to remove so make sure the paint is traced thick.
4. Carefully peel them away slowly starting from the edges. If the paint is thinner it gets slightly harder to peel tearing apart or might even loose shape.
Secure it with your hands and stick onto windows or flat surfaces. It also clings to flat wooden surfaces.
Wow! I love the color.
I also traced the Merry Christmas letters. It couldn’t fit in one page because if its size so I haven’t provided a copy here.
They look so pretty with blue lights, a perfect atmosphere for Christmas.
Happy holidays with your family and happy festive crafting ☺
This fresh juice of beetroot, carrot and apple has a wonderful rich red color of beets with their natural sweetness. Its stunningly delicious which has been one of my favorites ever since. Having this chilled was refreshing and has been considered as a miracle drink because of a wide range of health benefits.
Preparation time: 5 -10 minutes
Appliance: Juice machine / Juice Blender
Makes: 2 – 3
Ingredients
Raw beetroot – 1 medium / 165 g , peeled, washed and roughly chopped (*see notes)
Carrots – 1 medium / 100 g, peeled, washed and roughly chopped
Apple – 1/ 135 g, washed and roughly chopped
Water – 1 cup
vegetable brush (optional)
Directions
1. Wash the beets and carrots under cool running water removing any dirt, residues on the skins or bruises and molds. If you intend to use the skin scrub it with a vegetable brush.
2. Cut the beets, carrots and apples removing any pits and areas you do not want to juice.
Put them in a juice blender with 1 cup water (*see notes). Run the juicer for a minute to get it moving. Add some ice cubes and run for few more seconds until they are all juiced.
3. Its best to serve immediately for optimal freshness and nutritional content. The lon
Notes
*I suggest preparing this juice intended for one time and not storing it which otherwise could create stomach discomfort.
*Portion the beets, carrots and apple to fit easily into your juicer not to overstuff, otherwise the juicer blade and motor could get damaged.
*Using ice cubes tends to heat the juice less to maintain the freshness.
*You can include the stem and greens of beetroot to boost the nutritional content.
For more on chilled drinks click and hover on the link below
This is a recipe which I prepare quiet often when I am on the hustle. It is one of the easiest recipes to side with anything. Now, that is one good reason why I couldn’t post this recipe earlier. Still, this time with my husbands help in clicking pictures I post this recipe today.
This is one of the easiest side dishes to prepare. It is also one of the most delicious options when you have ready-made paneer on hand. You can whip up this dish in under 30 minutes. This vegetarian dish is sure to delight your family and friends. You can also check my earlier post on Paneer Butter Masala recipe. It offers a different version with some gravy. This version can go with rice. You can also find us on Facebook at Delicious Sweet Aroma page.
Preparation time: 5 minutes
Cooking time: 20 minutes
Serves – 2
Ingredients
Paneer / Indian cottage cheese – 240 g
Garlic cloves – 2, finely chopped
Onion – 1 medium, roughly chopped
Vinegar – 1 tbsp
Tomato ketchup – 2 tbsp
Nando’s Peri -Peri sauce (mild) – 3 tbsp, depending on spice level
Oyster sauce – 1 tbsp
Soya sauce – 2 tbsp
Sesame sauce – 2 tsp
Green chilies – 1 small
Bell Peppers / Paprika ( red preferably) – 1, chopped with seeds removed
Pepper powder – 1/2 tsp
Salt
Directions
1. Heat a saucepan with oil on medium-high. Once hot add chopped garlic and fry for a minute until the raw smell goes away. Add chopped onions and fry till they turn translucent.
Add tomato ketchup.
2. Add the sauces of Nando’s peri-peri, oyster sauce, chilli powder, coriander powder and vinegar. Mix and combine well.
3. Add soya sauce, sesame oil and toss in the paneer cubes with salt. Mix to coat it with the mixture. Do not over mix.
Cover and cook for 4 – 6 minutes on medium until paneer is cooked.
4. Lastly, add the green chilies and chopped paprika. I didn’t have the red paprika that day. I usually prefer it for an intense flavor. So, I used the green pepper instead.
Since the time I have learnt how to make a Pizza 🍕 at home, trust me! This recipe will make your jaw-dropping 😵😱 once you learn the technique of how its done. The pizza crust is soft and crisp on the edges. A great motivation to learn how to make homemade pizza with customized toppings.
Making a pizza dough from scratch seems a bit tricky for first timers but its encouraging and promotes opportunities to learn the art of cooking. One can prepare the dough at least one day ahead and freeze them.
Preparation time: 20 minutes + rising 1 hour
Cooking time: 25-30 minutes
Makes : 10 to 11-inch / 26 to 28-cm
Serves: 1-2
Appliance: Oven
Ingredients
For the dough
Bread Flour – 1 cup / 175 g
All-Purpose flour for dusting
Salt – 1/4 tsp
Water – 1/4 cup / 100 ml
Yeast – 1 tsp
Sugar – 1/2 tsp
Olive oil – 1 tbsp
Parchment paper of 12 cm
Toppings
Tomato sauce – 3 to 4 tbsp
Mozzarella cheese balls / Bocconcini cheese – 125 g
Chicken breasts – 200 g , pan-fried (if using prawns – less than 250 g shelled, raw)
Capers – 7
Jalapeno (non-spicy) – 7
Shallots -2 , cut into round thin slices
Nando’s Peri-Peri Sauce (medium) – 3 tbsp
Cherry tomato – 7, halved
Mini peppers / Bell pepper – few pieces, chopped
Olives – 3, pitted
Garlic paste – 1/2 tsp
Directions
Making the Dough:
1. In a cup with warm water dissolve sugar and yeast. Mix and let stand for 5 minutes at the kitchen counter or in a warm place until it turns frothy. Add Olive oil and mix.
2. In a bowl with bread flour and salt, make 2 wells and pour the yeast mixture. Stir in the flour using your hands to combine the dough. If its dry just add 3-4 tbsp more water till all the flour comes together.
Dust a work surface or large wooden cutting board with all-purpose flour and remove the dough. Knead the dough by rolling it forward and backward to push and pull using the heels of your hands. Do this for 5 minutes, it must be elastic and non-sticky.
3. Place the dough in a lightly greased bowl of oil. Cover with double layered towel to proof for 45 minutes(*see notes). The dough will double in size.
4. Dust the work surface with all-purpose flour and remove the dough from the bowl. Give it a good punch to let any air out and work on it for 5 minutes (you can separate the extra dough at this point and freeze)
Place it in the greased bowl just as in step 3, covered with towel or cling film and proof or rise for another 15 minutes.
Roll out the dough:
5. Lightly dust the work surface/board with all-purpose flour, then roll it out using your hands or rolling-pin into a rough circle. When it gets unmanageable transfer to a parchment paper of 10-cm depending on the size of pizza.
6. Roll the dough into 1/4 inch thick or less. Prick the pizza base all over with a fork.
Topping the Pizza:
7. Spoon few tablespoons of tomato sauce into the center of pizza and spread it throughout the base to the edges using the back of the spoon.
Then, top it with thin slices of cheese. Add other toppings of choice as mentioned above along with thin strips of chicken.
8. Preheat oven to 200 degree Celsius (400 degree F) for 5 -10 minutes. Place the pizza on parchment paper carefully on the low rack. Bake on convection mode for 25 – 30 minutes or until the sides have turned slightly brown (*see notes).
The first pizza I made was the Prawn Pizza with mozzarella cheese, some greens, capers, olives and peri-peri sauce. Delicious soft and crisp crust which I would recommend for all the seafood lovers.
Notes:
*You can use all kinds of toppings for your pizza. But, it is best not to load it with too much of toppings otherwise the pizza base might get underdone.
* If you live in a colder climate, place the covered bowl in a larger bowl of warm water (not too hot) or near the heater. It might take a longer time to rise.
*I have used Bocconcini cheese i.e mini mozzarella cheese in my chicken pizza, the size of an egg, hence one wouldn’t notice the cheese. My prawn pizza is topped with large mozzarella cheese balls which I would always prefer using.
*Chicken breasts can be pan-fried while waiting for the dough to rise.
* In case the temperature is too high reduce temperature to 175 degree Celsius (350 degree F) after 10 minutes.
*For more servings, double or triple the dough ingredients and portion the dough in Step 4 depending on the size of pizza. Wrap it with clingfirm and freeze for another day.
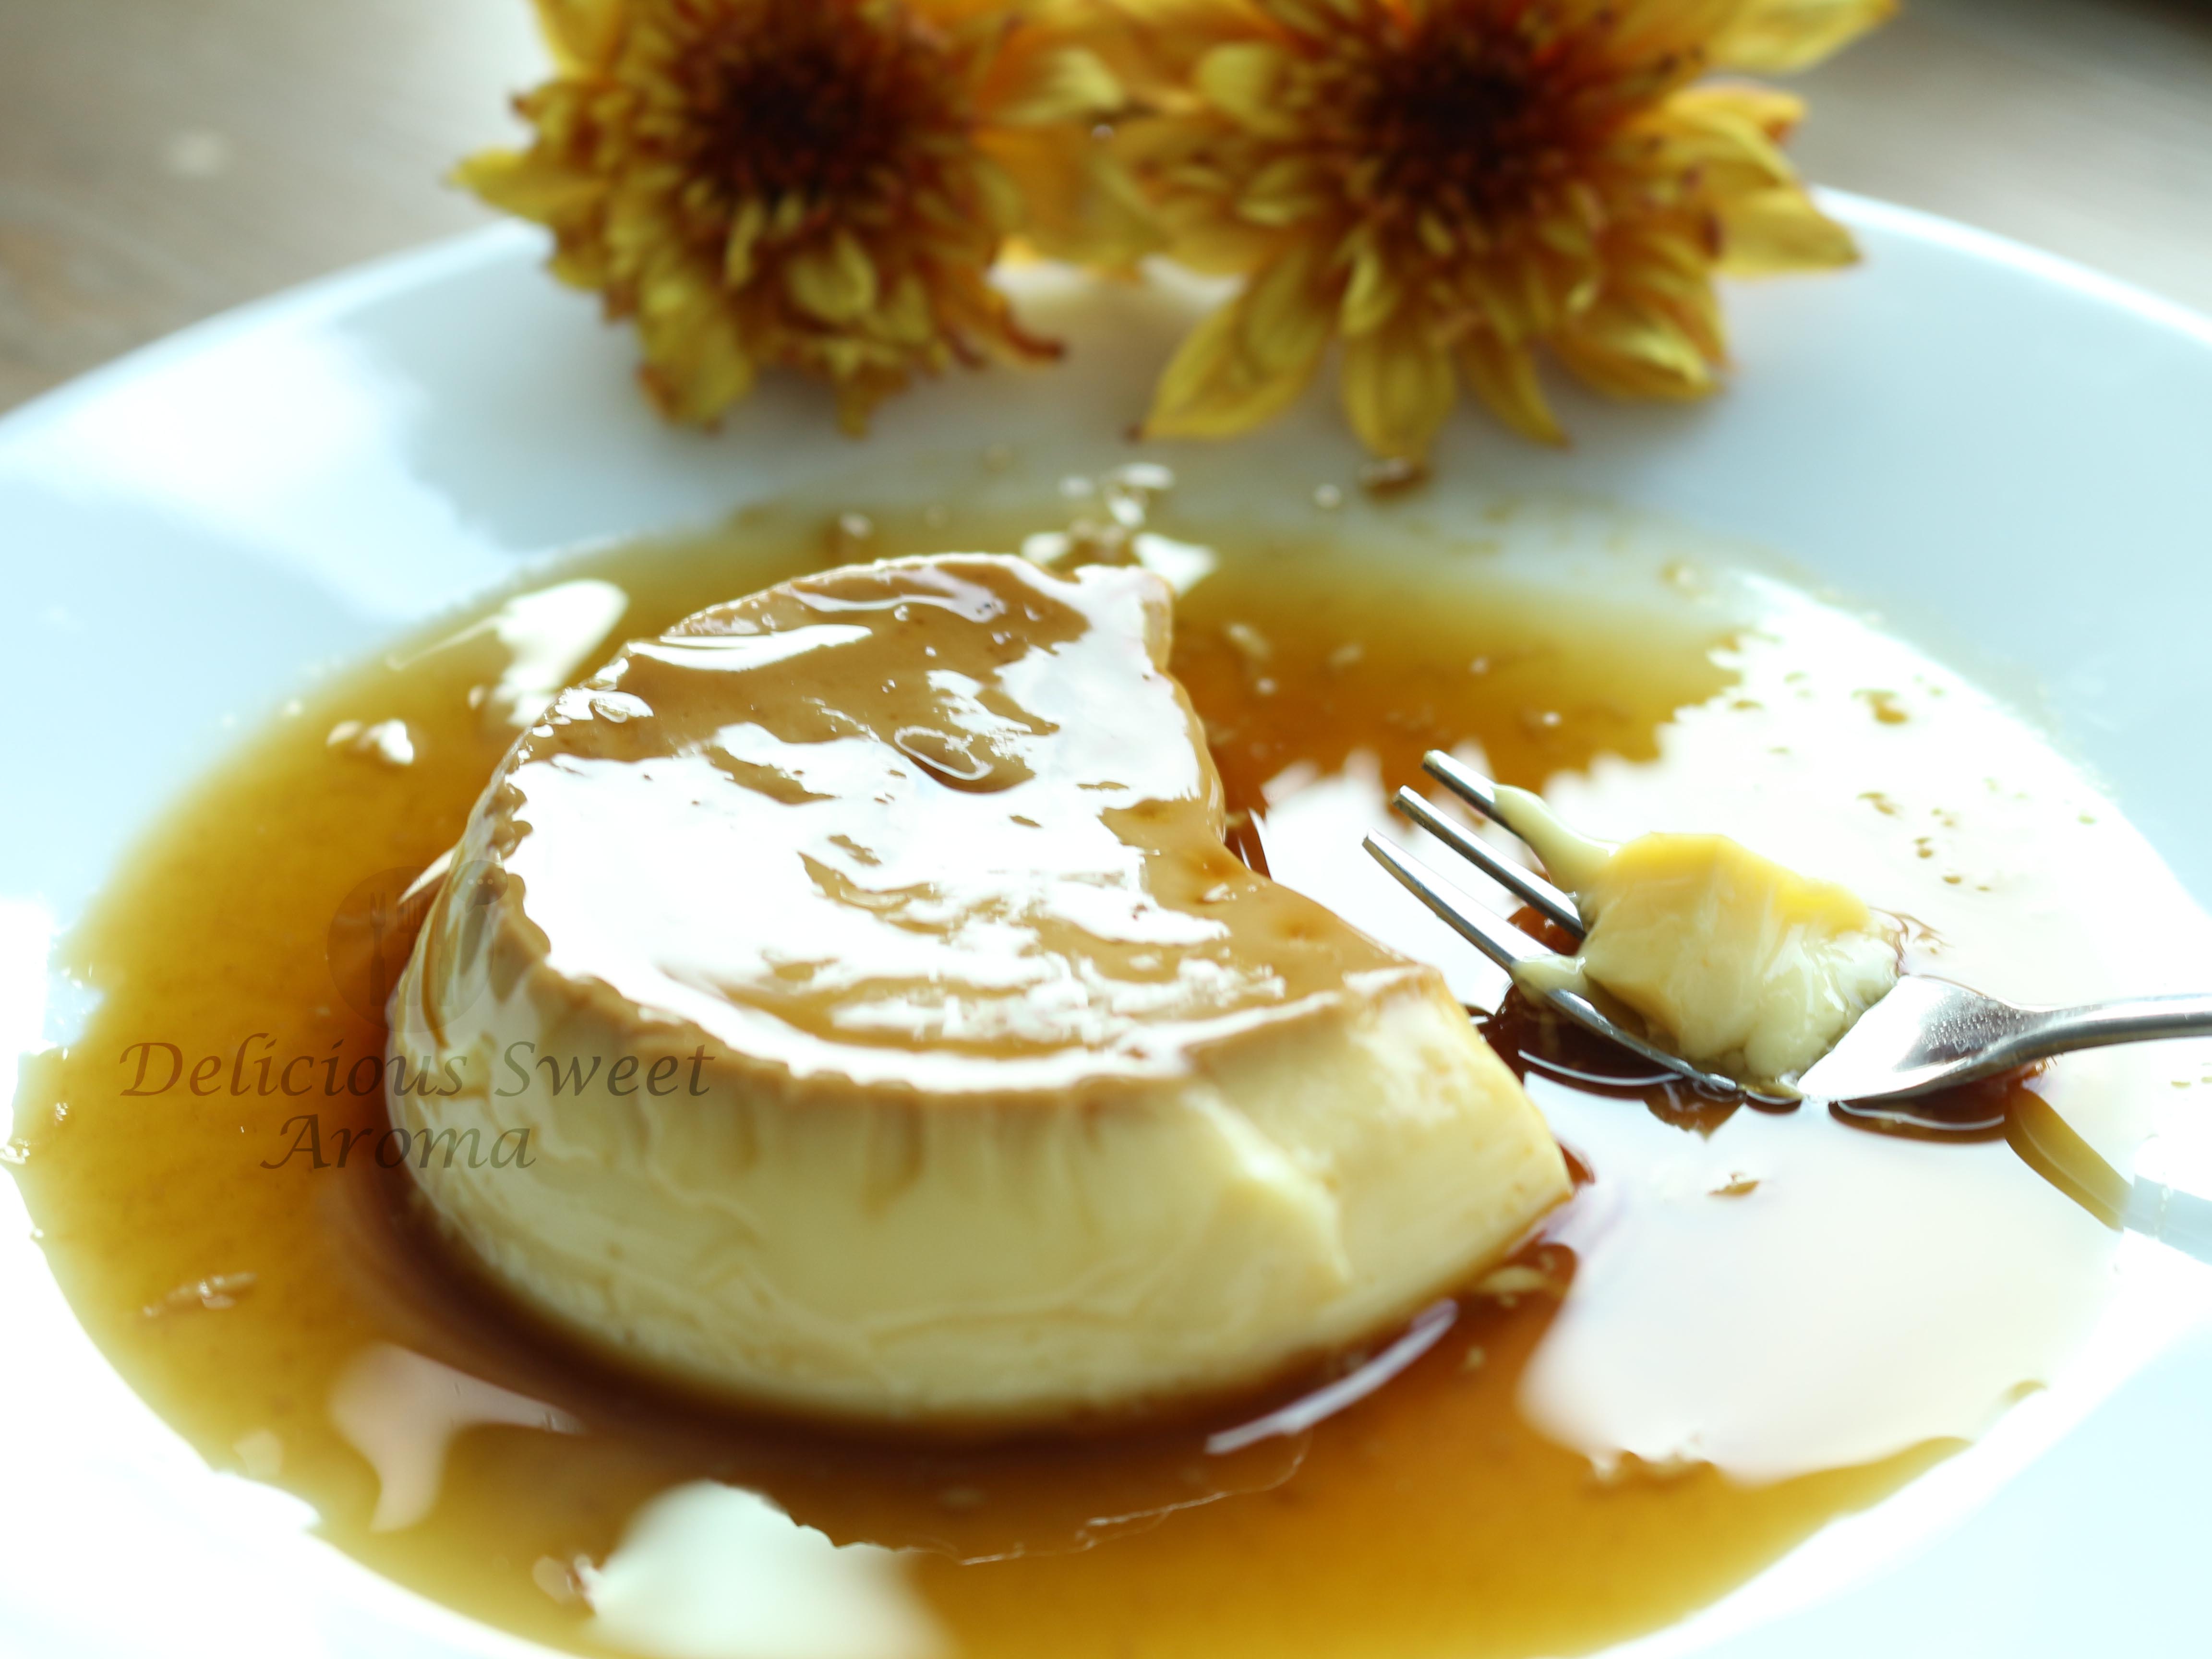
This is an easy caramel pudding dessert with just 5 ingredients. It has a Malaysian twist by adding caramel of palm sugar, known as ‘Gula Melaka’ in Malay. Making a quick recipe with few basic ingredients that I can put together with less effort was my intention. It is creamy, delicate and irresistible for an after-meal dessert.
For a caramel pudding with fruity flavor please refer to my earlier post on caramel orange pudding.
Preparation time: 5 minutes
Cooking time: 30 – 45 minutes
Serves: 4
Ingredients
Caster sugar – 50 g
Eggs – 3 large
Milk (pasteurized) – 1 cup, room temp but not hot
For the caramel:
Palm sugar – 50 g (*see notes)
Water – 1/4 cup
Directions
1.Preparing the caramel :
Break the palm sugar into small pieces and place them in a heavy-bottomed pan.
Add the water and heat the mixture on medium heat, stirring until fully dissolved. Continue heating until the syrup boils.
Pour them using a strainer into ramekins right away or any container of choice.
Since palm sugar naturally holds some particles, it’s thus best to strain them to achieve a smoother consistency.
It will turn sticky if you leave it at room temperature for longer so transfer into ramekins promptly. Reserve the ramekins.
2. In a small bowl, whisk the eggs and sugar. Strain through a sieve, add milk (or you can strain after adding milk) and pour into the ramekins.
Cover the ramekins or containers with Al-foil.
3. If using the method of steaming on stove top use the method shown here
Place 2-inch water in a large wok or heavy-bottomed pan. Place ramekins over a 2-inch stand just touching the water level. Cover with a tight fitting lid and cook on medium-high for 30 – 40 minutes or just until set. Turn off heat and let it sit for an hour.
4.If using a convection oven to bake:
Preheat oven 150 degree Celsius (300 degree F / Gas 2). Place ramekins in large rectangular glass baking tray with hot water halfway up the sides of the dishes. Cover the whole tray with a Al-foil again and bake 40-45 minutes.
Let it sit for 10 minutes in the oven without letting any air out. Then check if they are firm or set.
5. Remove the ramekins and leave to cool. Chill them for 4 hours or until they are cold enough before serving.
Run a knife between the edge of each ramekin. Place a plate over the ramekin, holding the plate in one hand and other on ramekin carefully invert. Tap the ramekin base shaking them gently and lift.
Notes:
*If you can’t find palm sugar or jaggery replace it with sugar.
Please help us for any improvement by commenting below or messaging me on Facebook page here >> Delicious Sweet Aroma. Do remember to Like and Share my recipes with your friends. Happy Thanksgiving with your loved ones🌾🌹. Have a great weekend! 😇
Sherryl ❤
Stay Healthy!
Easy Caramel Pudding
Sherryl Andria
Indulge in a luscious, melt-in-your-mouth dessert that combines the richness of eggs and milk with the deep, caramelized sweetness of palm sugar.
Heat the mixture over medium heat, stirring constantly, until the sugar completely dissolves.
Continue heating until the syrup boils and turns into a rich caramel color.
Remove from heat and carefully pour the caramel into the bottom of your molds or ramekins using a strainer.
Set aside to cool and harden slightly.
Make the Custard
In a bowl, whisk the eggs and caster sugar until well combined.
Slowly add the room-temperature milk to the egg mixture, whisking gently to avoid creating too many bubbles.
Once fully mixed, strain the custard through a fine sieve to remove any egg particles for a smooth consistency.
Combine and Steam
Pour the custard mixture over the cooled caramel in the ramekins.
Place the ramekins in a steamer.Steam over medium heat for 30 – 40 minutes, or until the custard is set but still slightly wobbly in the center.
Be sure to cover the steamer lid with a cloth to prevent condensation from dripping onto the custard.
Cool and Serve
Once the custard is done steaming, carefully remove the ramekins from the steamer and let them cool to room temperature.
Refrigerate for at least 2 hours to allow the custard to fully set.
To serve, run a knife around the edges of the custard, then gently invert it onto a plate, letting the caramel flow over the top.
Bake in a preheated oven at 160°C (320°F) for about 40-50 minutes, or until the custard is set but still slightly wobbly in the center.
Notes
If using an Oven to Bake:
Place the ramekins in a baking dish and fill the dish with hot water, halfway up the sides of the ramekins (this is called a water bath or bain-marie).
Bake in a preheated oven at 160°C (320°F) for about 40-50 minutes, or until the custard is set but still slightly wobbly in the center.
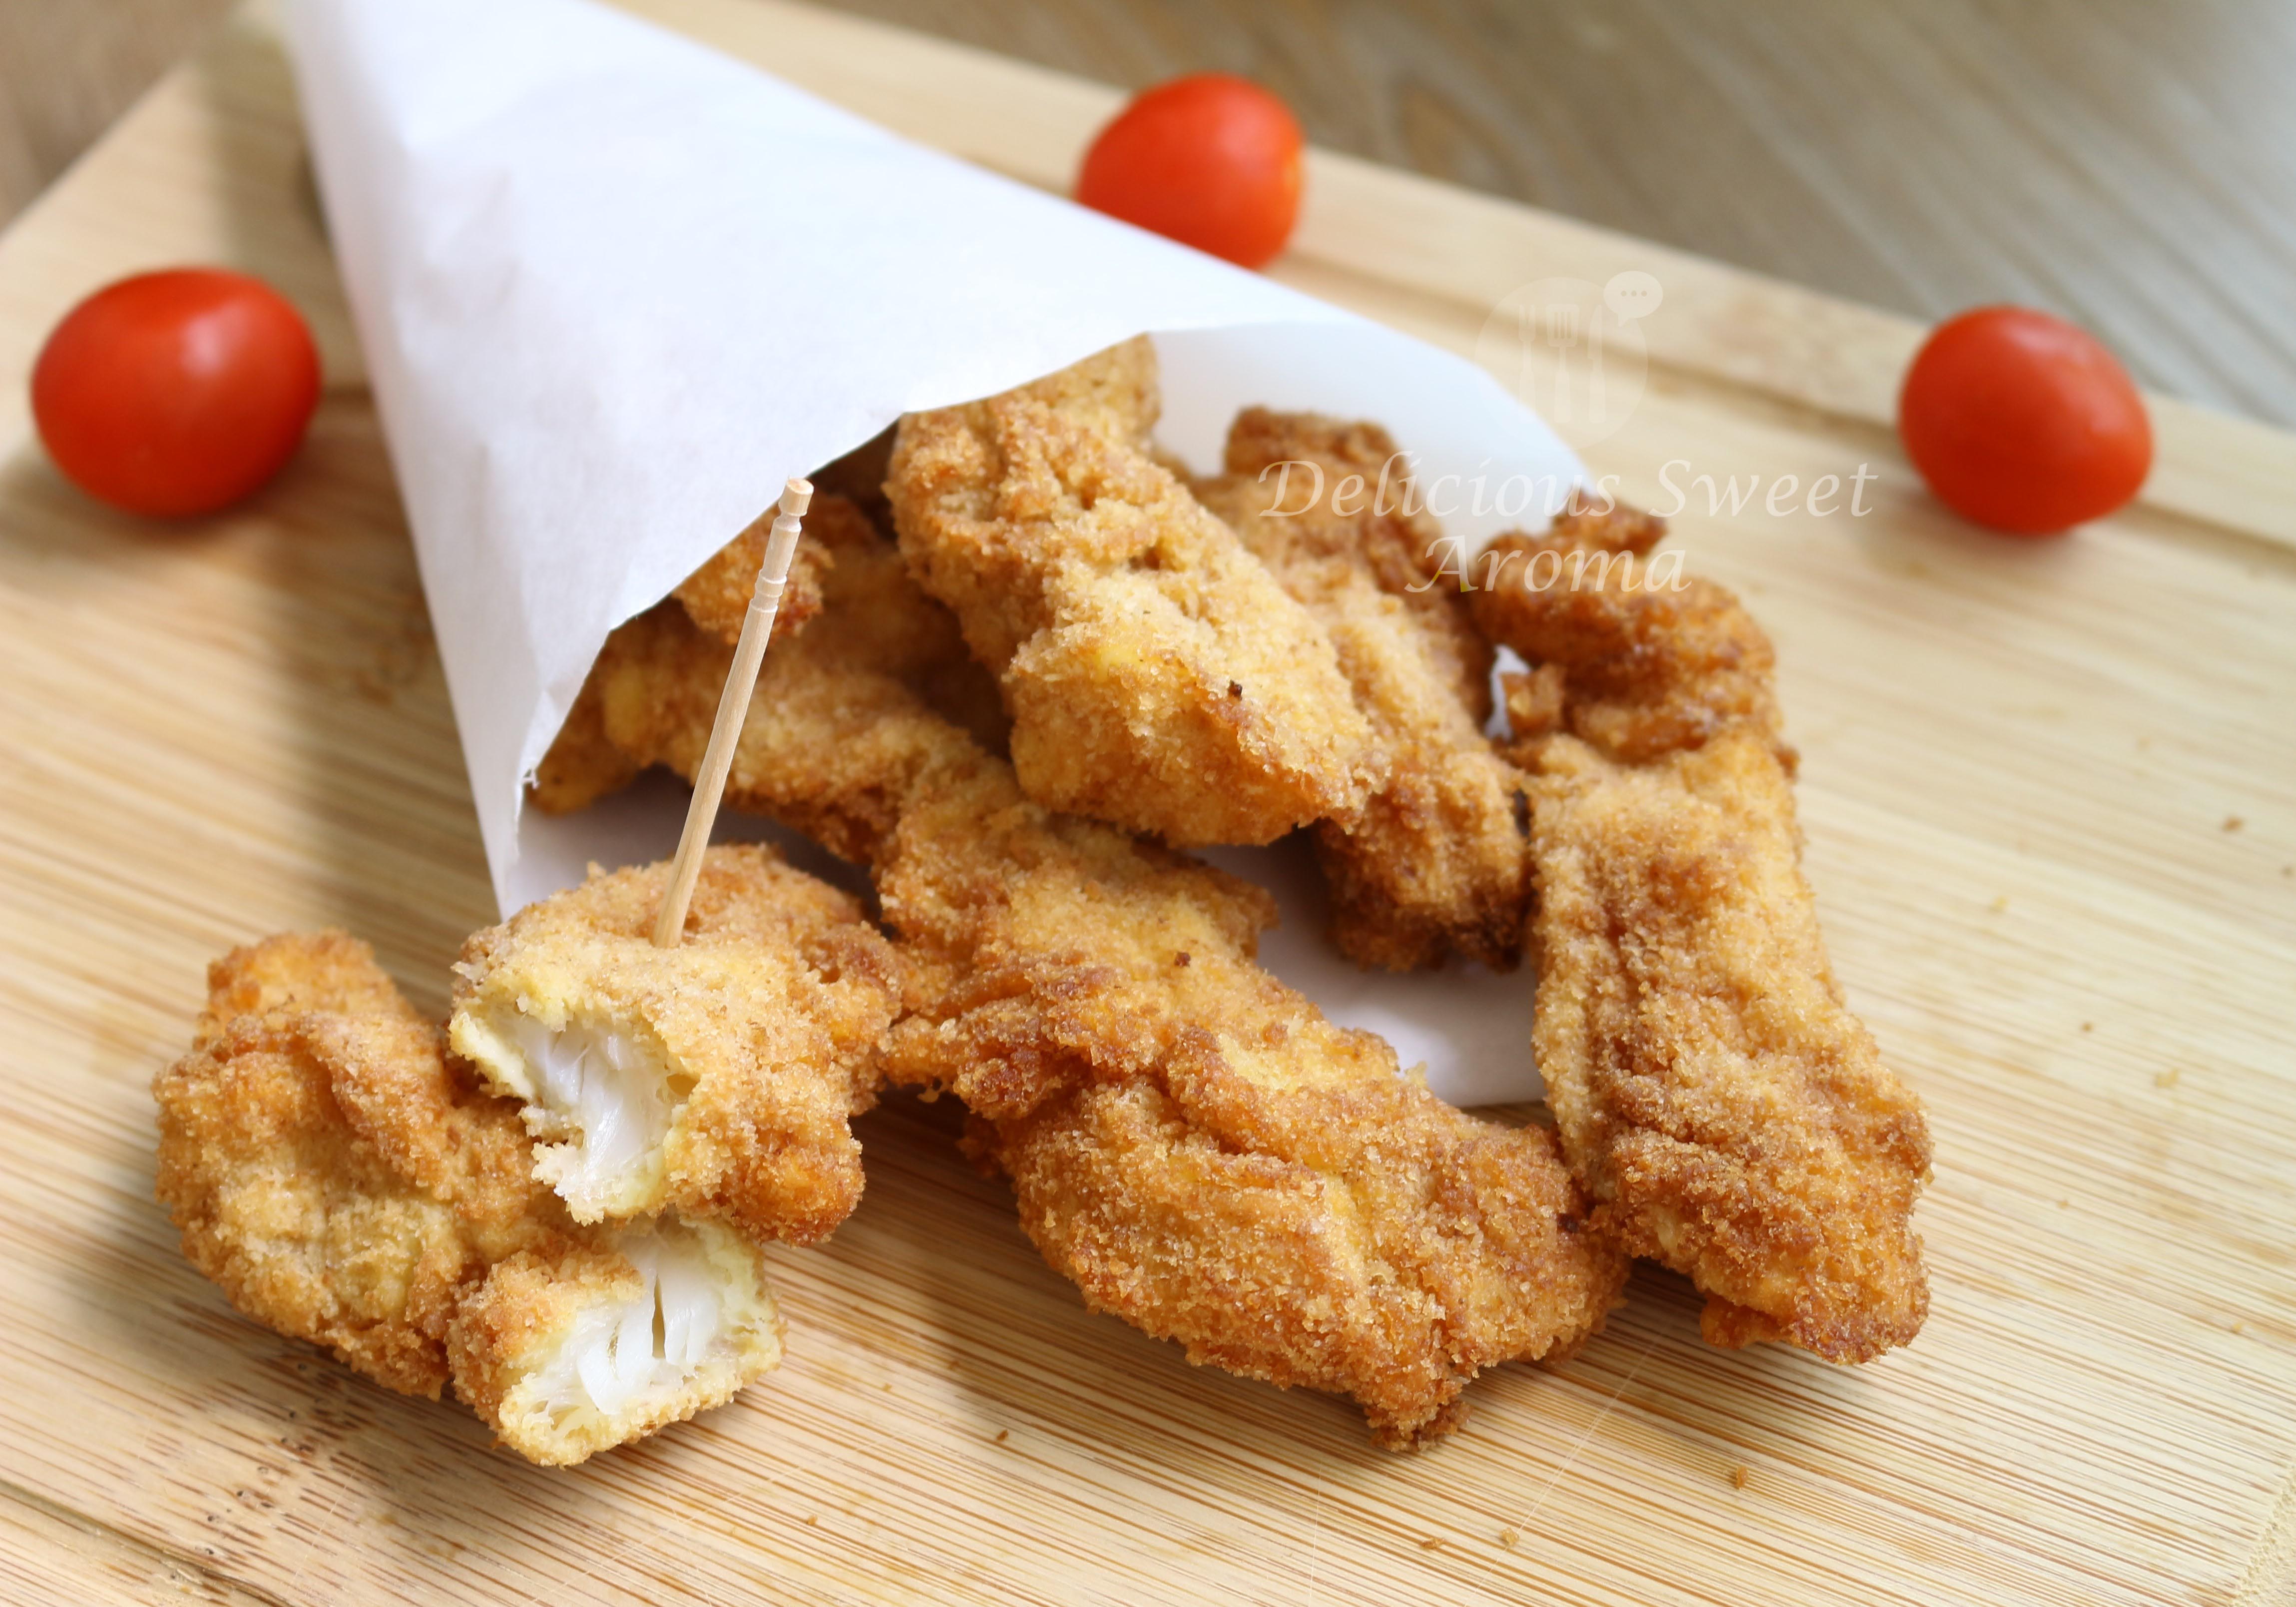
No-bake recipe of dory fish fillet seasoned and coated with egg, flour and breadcrumbs. One can serve these as party snacks with tartar, mayonnaise or mustard dips. For accompaniment as mains serve them with some greens. An even easier and quick way is making a fish fillet sandwich. You can also serve them on a slice of baguette topped with sauce during a weekend get-together party.
Preparation time: 25 minutes
Cooking time: 5 minutes
Serves: 2
Ingredients
Vegetable oil for deep frying
Dory Fillet – 1 large, salted and sliced as shown below
Eggs – 2, lightly whipped and salted
All-purpose flour – 1/2 cup or more as required to coat
Breadcrumbs – 1 cup
Directions
1. Sprinkle some salt over the fillets. Cut the fish fillet into long diagonal strips of 2 cm / 1.5-inch wide using a long sharp knife.
2. In one shallow bowl whisk 2 eggs with a fork, add 1/4 tsp salt. In a zip-lock bag with flour, season lightly with salt. Place breadcrumbs in another bowl.
Whisked Egg, Flour in a zip-lock bag & Breadcrumbs
3. Dip fish strips into the egg, coat well turning sides. Place few of them in the bag containing flour and shake to coat.
Dip them again in egg.
Lastly, coat them with breadcrumbs. Place them on a plate.
4. Heat 1-inch oil in a deep-bottomed container on medium (induction #6). When its hot enough a small piece of breadcrumb sizzles. Add the fish strips in batches not to overcrowd.
Fry for a minute and turn side until it turns slightly dark brown. Drain using a slotted spoon on a kitchen paper towel.
5. Serve hot with lemon wedges or sauces of choice.
The idea of making a quick sandwich popped into my mind. I grabbed some fish fillets and used the wholegrain bread I had in the fridge. I toasted each slice in the pan for 2 minutes, just enough to get a light crisp. Then, I spread it with mustard sauce and topped it with cherry tomatoes stuffed with fish fillet. This was filling and was quick and easy. You can also add some pickles and veggies to make it a perfect low-cal meal. If your having a party at home serve it in small portions to make an elegant appetizer.
As a hobby I blog on recipes that fascinates me to learn the art of cooking inspired from people to places I've been. In my recipes you will find step-by-step pictures with instructions for easy cooking. Hope to hear your views, share pics and have fun.
Happy cooking!