Author: Sherryl Andria

Lasagna

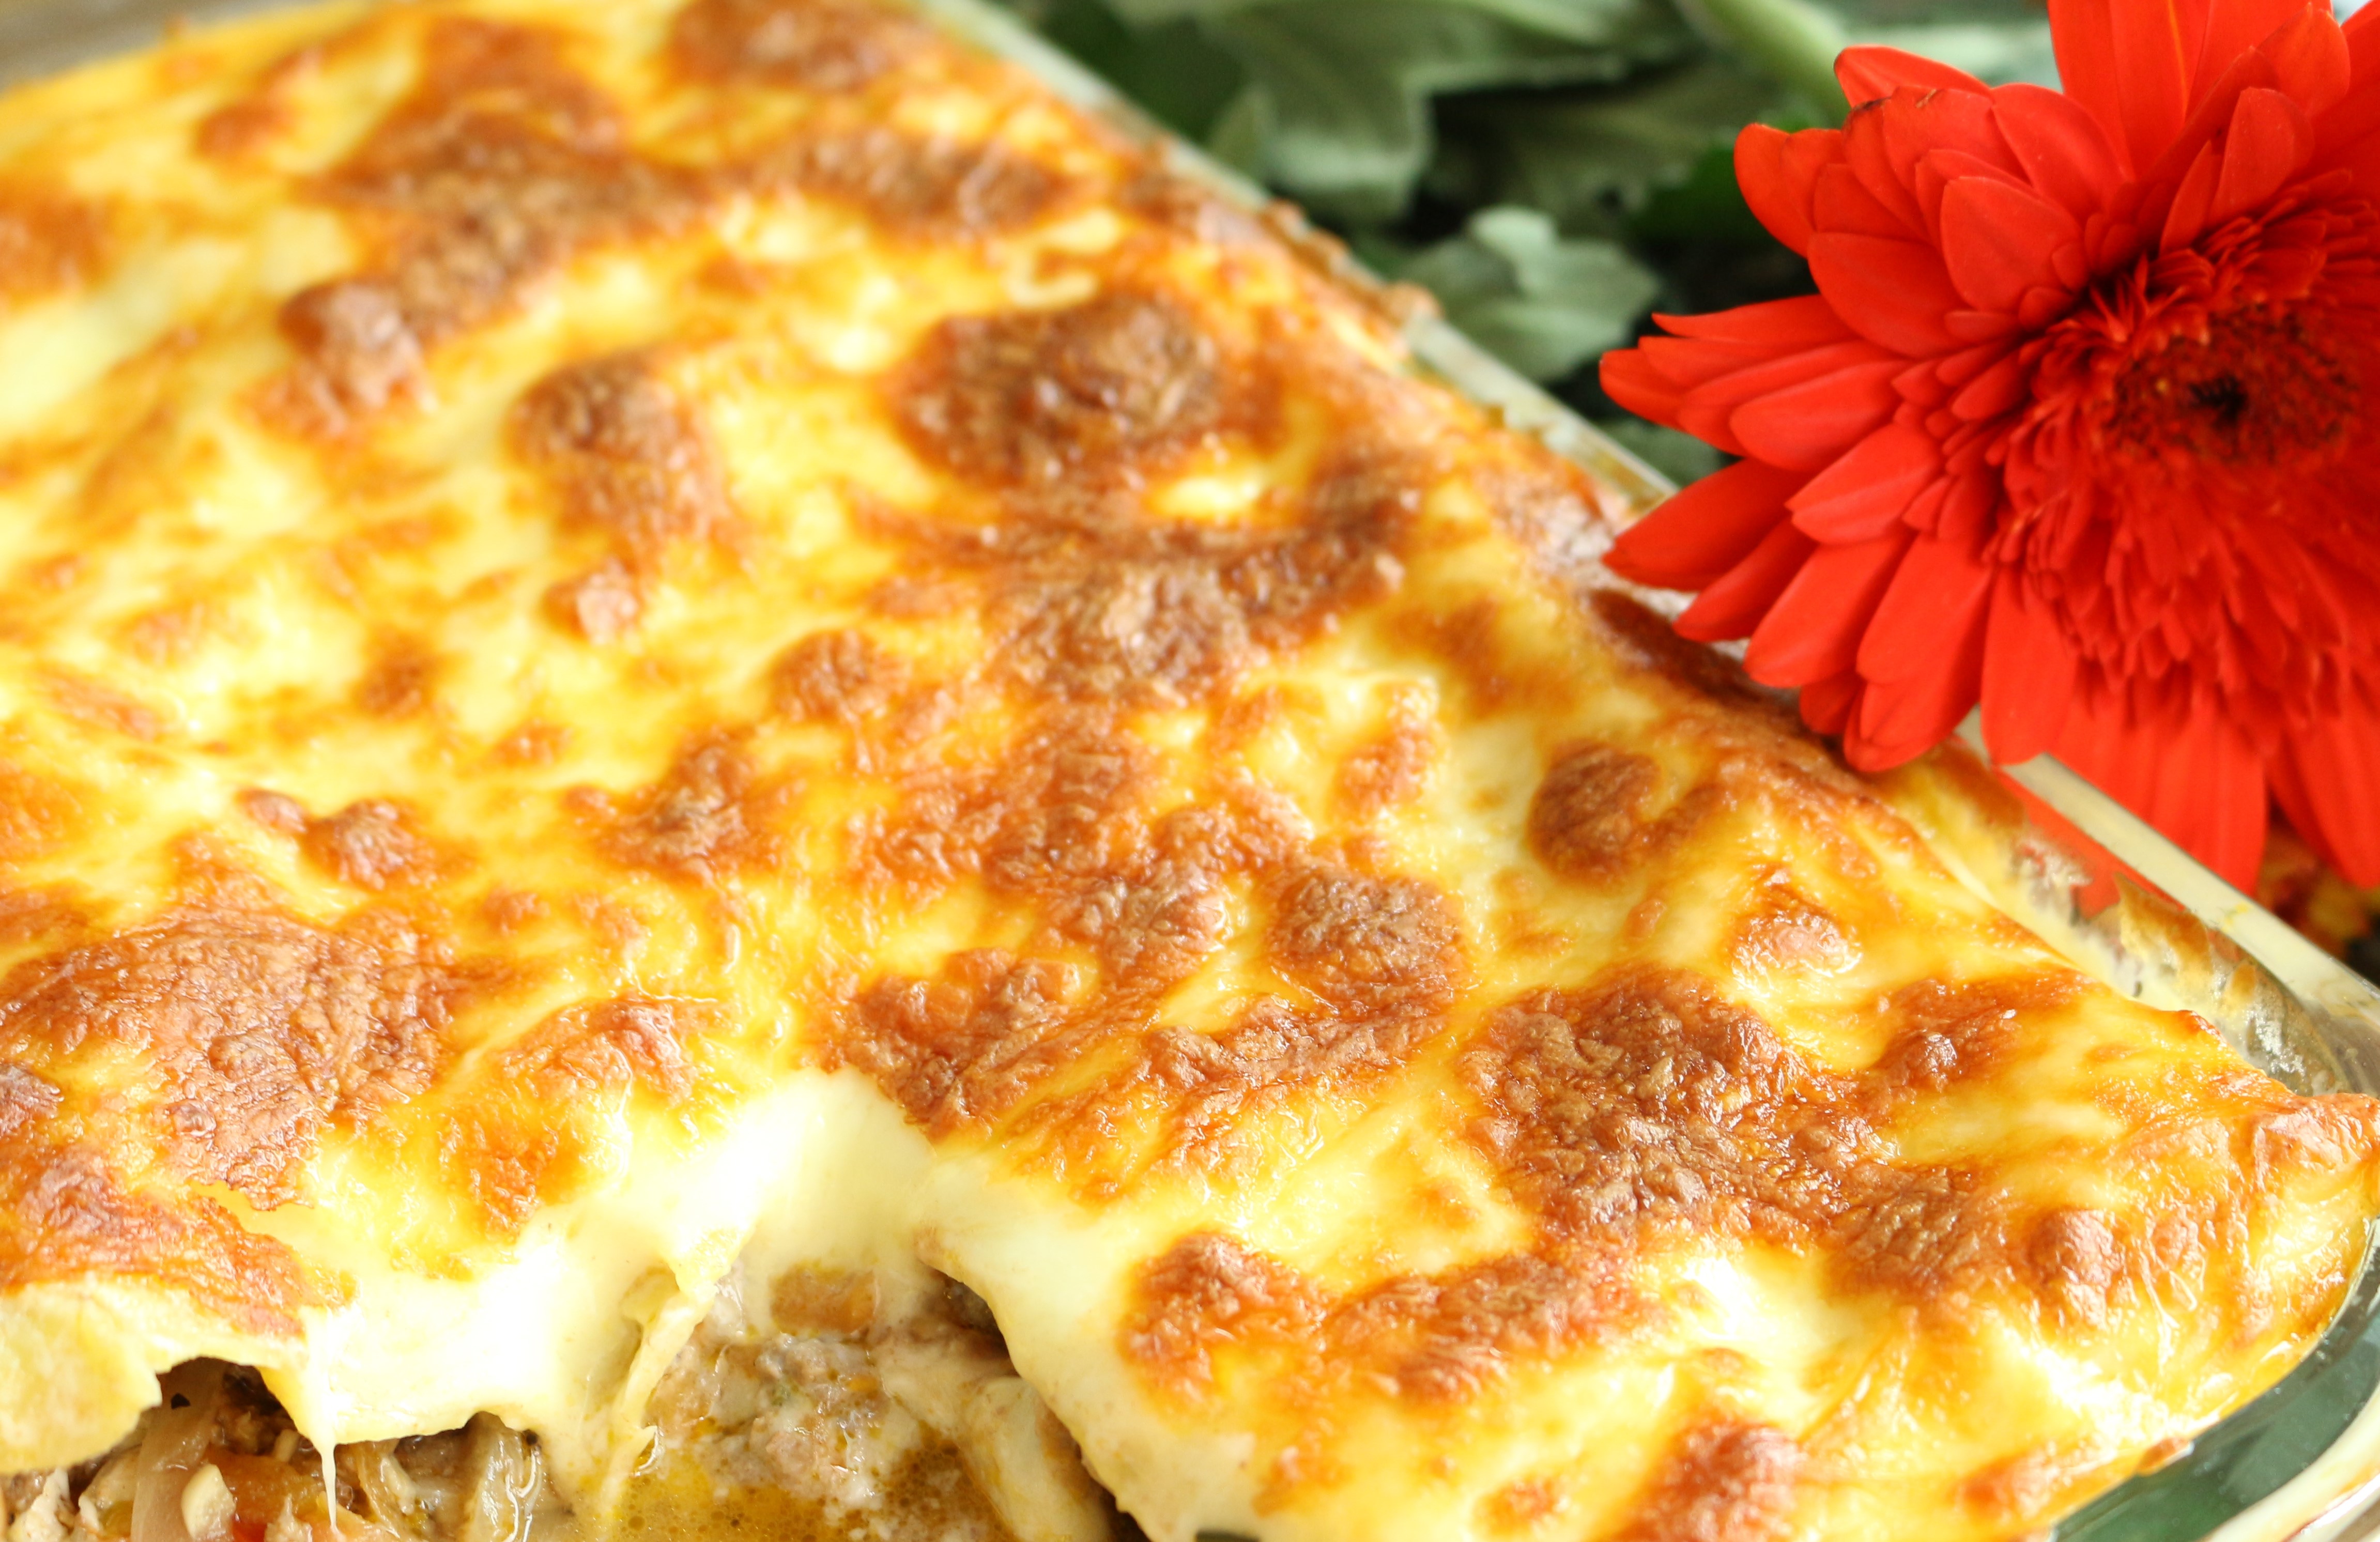
Today, I am posting this recipe of classic lasagna, everyone’s favorite. It’s a great comfort food and can be prepared to please a small crowd or for potluck parties.

Thanks to my lovely cousin who gave me this idea of making a lasagna. She loves it and I hope to see her try this recipe.


Preparation time: 25 minutes (includes layering)

Cooking time: 70 minutes

Requirement: Baking dish 9*28-cm / 4*11-inch

Serves: 4

Ingredients

Lasagna sheets – 6 or more

Jamie Oliver lasagne sheets

Beef mince / ground – 500 g

Butter for beef + 75 g bechamel sauce + coating the baking dish

Onion – 1 large, thinly diced

Garlic cloves –  2, finely chopped

Celery leaves / stick – 1/2 cup / 1 stick, finely chopped

Shredded carrot – 90 g

Nutmeg – 1/4 tsp (grated)

Pepper powder – 1 tsp

Salt

Tomato puree / sauce – 470 g / 6 small

Mozzarella / Parmesan Cheese – 50 g or more


Bell peppers – 1

Cherry tomatoes – 10 to 15, cut into halves

Bechamel sauce / White sauce: Balloon whisk is required

All-purpose flour – 4 tbsp

Hot Milk – 2 cups

Salt to taste


Directions

1. Preparing the beef:

Melt a small slice of butter in a large wok or pan at medium high heat, add onion and fry till translucent, then add garlic. Fry for a minute. Add carrot and celery. Mix and fry for 2 minutes. Stir in the beef breaking it up and brown until just changing color, but not hardening.

Beef mince filling

Add pepper powder, salt, nutmeg powder and tomato puree/paste, mix well. Cover and cook for 5 minutes or until all the water oozes out. Uncover and cook till all the water is gone.

Beef mince filling2

2. To toast the bell peppers: Heat a pan on high and place the skin side facing down. Toast them until brown. It can also be baked whole in the oven for few mins until its brown.

bell peppers

Cut into pieces of desired size and reserve with cherry tomatoes.

3. To prepare the Bechamel Sauce:

Melt 75 g butter in heavy-bottomed saucepan. When foaming stir in the flour and cook over gentle heat for about 2-5 minutes without letting it brown. Take it off the heat and add all the milk at once, whisking very well.

When all the flour and butter have been combined with no lumps, return to the heat and slowly bring to a boil whisking all the time. When it comes to the boil add salt and simmer gently for 2-3  minutes.

Bechamel Sauce or White sauce | Lasagne sauce | Delicious Sweet Aroma

4. Layering:

Spoon the white sauce into the buttered baking dish. Cover with lasagne sheets and spread the beef mince.

Add another layer of bechamel sauce, top it with bell peppers and cherry tomatoes. Continue with the beef mince. Repeat twice more, finishing with a layer of white sauce covering the whole top.

Sprinkle with mozzarella cheese and bake on convection mode in a preheated oven at 180 degree Celsius for 20 – 30 minutes.

Convection oven baking lasagne

5. After 30 mins if the top layer has not browned, increased the temperature to 200 degree Celsius (Gas 4) for 5 more minutes or until brown and bubbling.

6. Let stand for 5 – 10 minutes to settle and firm up before serving.

IMG_9038

IMG_9046

IMG_9047

My thoughts on this recipe 👉👉 I would recommend making the first step of this recipe a day in advance and freezing it to reduce time.


Cook’s tip:

* If you plan on making a day in advance, cover it with a foil and store it in the fridge. It might take longer to bake since it’s cold.

*Making few days in advance: Assemble it and bake it. Store it in the freezer unless you would want to use it within 2 days. Re-heating tastes better and might need more time to heat. So make sure you pop it in the oven without defrosting otherwise it might turn watery.

*Cover with a foil while re-heating and that’s when it comes handy when you don’t want your frozen lasagna to be browning on top and cold inside.


Hope you will love making this recipe. Please share your thoughts on comments below 👇 Untill my next post.. Bye! 👋 ☺


Stay Healthy!


Read More

Semolina Pancake / Dosa

Apart from being a delicious Semolina dosa or crepe one thing I like when I prepare this recipe is never have to think about soaking rice for 3 hrs, making a paste by blending it or going through my pantry to check if I have enough rice stocked up. Most recipes of Indian crepe or dosa needs to go through a fermentation process for a fluffy batter and this is one of the recipes which can be prepared within minutes, without going through the hassle of what kind of rice grain is required for it.

If you are trying this for the first time, make sure you have the right appliance or griddle with even heating. My first attempt was a hit and was on a portable hotplate which later got damaged over time and thereafter my pancakes were not cooking evenly.  That’s when I realized my pan was also damaged (thus pancakes turning sticky on the base). However, I managed to get a good tawa made for induction cooking (fits perfectly on my induction hob) after browsing through stores.

When I made my first beautiful semolina crepe with a dip of Asafoetida chutney and tomato rasam (my hubby prepared this – I wished I had taken pictures but I guess will have to wait for the recipe until he does it again 😋)

first pancake_IMG_7608


Appliance needed: Crepe pan/Tawa with tight-fitting lid, 25 cm non-stick

Preparation time: 10 – 15 minutes

Cooking time: 45 minutes

Makes: 10 – 12

Ingredients

Olive oil / Veg oil / Ghee 

All-purpose flour / Maida – 1 cup 

Semolina (fine) – 2/3 cup 

Salt – 1/2 tsp

Water – 2 1/2 cup 

Yogurt – 1/2 cup

Milk (pastuerised) – 1/2 cup

Shallot for coating the pan with ghee (*see here) – cut through the belly into half / through its root

Seasoning:

Mustard seeds – 1/4 tsp

Curry leaves – 1 long strand

Cumin Seeds – 1/2 tsp

Kashmiri red dry Chili – 2, halved


Directions

Preparing batter:

1. In a large bowl, Mix together flour, semolina and salt. Add water stirring between each addition until it is smooth without lumps.

Pour yogurt and milk . The batter must have a pouring consistency. Mix well and set aside.

Ingredients

Seasoning:

2. Heat a small container until hot coated with 1 tbsp veg oil , add mustard seeds. Once they sputter, add cumin, curry leaves and dry chilies. Toss it for half a minute and pour it into the batter.

Seasoning- semolina dosa

Mix the batter. Unfortunately I missed taking picture after seasoning but will update it the next time I make it. 🙂

Crepe Preparation:

3. Heat a crepe pan or omelette pan until hot, then rub around the inside of the pan using the shallot pierced onto a fork.

4. Using a large ladle pour about 100 ml or 1/4 cup (depending on the size of your griddle) into the center, then immediately tip the pan to coat the base evenly to form a thin base.  Drizzle some ghee along the sides. Cover with a tight-fitting lid and cook the pancake for 6 minutes on medium-high heat (induction  stove 6).

The pancake or dosa must be set entirely on the top and the sides must turn slightly brown.

pancake on a griddle_IMG_8963

5. Using a spatula, loosen the pancake off the griddle. Lift it off and place it on a flat/serving plate (*see notes).

Repeat with the remaining batter from step 4 to make as many pancakes needed.

lifting off crepe IMG_8962

Serve hot with any dip. My husband prepared coriander chutney to accompany the Semolina Dosa. I make this quiet often on weekends when we can relax and not use too much of our time in the kitchen. You can double the recipe for more pancakes and store left-over batter in the fridge to be used the following day.

semolina dosa IMG_8980

If you add more flour the pancakes become less brown in colour.

Semolina crepe_IMG_8982


Notes:

* To grease the pan with oil or ghee click here and check under directions 3-4.

* If your making the pancakes in advance, fold them in quarters and place them in an insulated box to keep them warm.

pancake in a insulated box _IMG_8954

*While lifting off or removing the pancake decrease heat and when pouring batter increase heat.


Stay Healthy! 🙂

Read More

Cucumber Steamed Cake / Mangalorean Mandas

Yesterday was Deepavali, so I thought of preparing this incredible rice cake called as Cucumber cake or Mandas (konkani) which my mom used to prepare occasionally at home. The steaming process gives a lovely aroma due to the common ingredients such as jaggery and coconut that I usually add to most of my mangalorean snacks (please check the Mangalorean Recipe categories for more on this).

Preparation time: 15 minutes + soaking time

Cooking time : 30 to 60 minutes

Serves: 4 to 6


Ingredients

Cucumber – 370 g / 1 large, peeled with seeds removed and chopped

Ghee / Oil – 3 tbsp

Idli rice / White small grain – 1 cup, soaked for 3 to 4 hours (*see here)

Fresh or frozen grated Coconut –  95 g

grated coconut

Jaggery – 70 g, powdered (more info on jaggery read here)

Jaggery


Directions

1. Soak the rice for nearly 3 to 4 hrs with water 2 inches above the level of rice. Prepare the rest of the ingredients.

2. First blend the cucumber to liquefy, otherwise the blender might heat up while adding the hard ingredients at the bottom.

Cucumber chopped

Then, add the rest of ingredients such as rice, coconut and jaggery. Do not add any water and blend to make a smooth batter of running consistency.

batter for cucumber cake

3. Grease the container with 1 tsp Ghee. Pour the batter into a container and drizzle 2 tbsp ghee. Run a knife through the batter to evenly spread the ghee.

preparing for steaming

Cover with aluminium foil.

4.  In a large pot or work with enough water, place it on a stand of water bath. Close the lid. Cook for 30 – 60 minutes until a toothpick or skewer inserted comes clean without any wet batter.

steaming process

Cooking time varies so check after 30 minutes. You can remove the foil carefully with a pair of tongs and place it back. Steam can be very hot hence must take care not to cause steam burns.

IMG_8937

Steamed Cucumber Cake


Thank you for visiting!


Stay Healthy! 🙂

Read More

Celery Soup

This simple creamy celery soup is a healthy recipe. I usually use just one or two heads of celery for my mutton soup and wasn’t sure of what to make with the rest. I think that celery is an underrated ingredient which I realized over time and has known to be a very healthy supplement to use on a daily basis. I’m not sure if everyone would love this soup but you must try it. I loved this soup and would think more than twice before tossing left-over celery in the bin.

If you would like to know more about Celery check here.


Preparation time: 20 minutes

Cooking time: 15 minutes

Serves – 4

Ingredients

Celery – whole bunch (for thicker soup)

Onions – 1 medium, chopped

Potatoes – 1 small

Salt for taste

Water for thickness consistency


Directions

1. Heat oil in a deep bottomed container on high. Add onions and fry till translucent.

Frying onions_IMG_8836

2. Add potatoes with a pinch of salt and fry for 3 minutes on medium. Then, add the chopped celery with 1/4 cup water. Cook for 7-10 minutes.

Transfer to a flat plate and let cool before tossing in the blender. It’s not a good idea to add hot ingredients into a blender.

Resting to cool_IMG_8839

3. Once cooled, blend it into a smooth paste.

Celery paste_IMG_8841

4. Transfer to the same container used before and set it on medium-high heat. Add 1 cup of water, season with salt and pepper. Stir to check for thickness required. You can add even more water for a less thicker soup.

Celery soup_IMG_8847

Enjoy!🙂🙂

Celery Soup_IMG_8845


More soups please click below and do not forget to follow me on FB: Delicious Sweet Aroma 🙂

Pumpkin Soup

Mushroom Soup

Carrot Soup

Pork Wonton Soup Recipe

Soup of Mutton Bone-Marrow


Stay Healthy!


Read More

Potato Bhaji / Aloo Bhaji – Vegetarian

Potato Bhaji or Aloo bhaji is a South-Indian dish served hot along with a round deep-fried bread called puri or poori also named as poori bhaji as a whole. It’s typically prepared spicy so you can add green chilies if you like it hot.


Preparation time: 10 minutes

Cooking time: 35 to 40 minutes

Serves: 3-4

Ingredients

Potatoes – 3 large / 500 g

Olive oil – 2 tbsp

Mustard seeds – 1/4 tsp

Curry leaves – 2 small stems, lightly rinsed and tapped dry

Ginger – 1 inch, mashed

Garlic cloves – 5 small, mashed

Asafoetida – 1/4 tsp

Onions – 1 medium, chopped thinly

Turmeric powder – 1/4 tsp

Green chili – 1 (optional for spice)

Salt – 1 tsp

Water – 3/4 cup

Directions

1. Prick the potatoes with the fork all over. In a large pot of  lightly salted boiling water cook the potatoes for 25 minutes on medium-high heat.

Cooking potatoes for 25 minutes | Potato Recipe

Drain them well and peel the skin. Mash them using a fork. Reserve for later.

2. Heat deep bottom container with olive oil on medium heat. When the oil is hot add mustard seeds, as they sputter add curry leaves, ginger and garlic.

Stir for a minute, then, add asafoetida powder, chopped onions, turmeric. Mix together and fry for 2 minutes for the onions to remain crisp.

Ingredients | Seasoning for Potato bhaji | Delicious Sweet Aroma

3. Add the mashed potatoes along with 3/4 cup water. Combine together, cover and cook for 5 more minutes.

Mashed potatoes | How to cook potatoes | Hungry?! That's what I made!

Keep an eye to see that it doesn’t get burnt at the bottom of the container by stirring occasionally.

Potato Recipe/Potato Bhaji/Aloo Bhaji - Poori Bhaji

I served it with hot crispy pooris (Indian deep-fried bread). A lovely combination and a great recipe for a vegetarian dish.

Potato Bhaji or Aloo Bhaji | Vegetarian Recipe | Delicious Sweet Aroma

I couldn’t manage to take detail pictures while preparing the pooris, so I haven’t posted the recipe of poori yet. But, if I prepare it anytime soon, I will make sure to share pictures and publish the recipe.

Potato bhaji /Poori Bhaji/Aloo Bhaji -Vegetarian | Delicious Sweet Aroma

In case you want me to post the recipe of pooris earlier, please comment below and I will post it for you. 🙂 Until my next post! 👋👋


More Vegetarian Recipes? Click below

Raw Jackfruit Dry / Kadgi Sukhi in Clay Pot

Pan-Fried Zucchini

Sweet Pulav – Rice Recipe

Mushroom Soup

Easy Beetroot Rice


Dessert:

Vermicelli Pudding or Kheer

Cocoa Easy Cake (No Eggs, Butter or Milk)


Stay Healthy! 🌹

Read More

Pear Cake


If you noticed, the last time I blogged a recipe was a week ago. Since then I have been thinking of ways to prepare something sweet that can be made with fruits. My husband is so charming that when he is home he doesn’t want me being in the kitchen the whole time preparing snacks or dishes for him that consume a lot of time. He would rather love watching television shows like Ozark or The Good Wife the whole day if possible. Yup! 😃

Yesterday evening before I could get dinner on the table, I gathered all the ingredients for the Pear cake 🍐. It was quite simple and was less complicated with just few basic ingredients a cake always needs. This is the first time I baked a cake for this long with a waiting time of 60 minutes but, was super easy to prepare. It was delicious, less sweet (I usually prefer that way) and just what I expected.

If you are reading this, then I would like to hear from you. My Facebook page is also available for any comments. Happy October!! ☺


Preparation time: 20 minutes

Cooking time: 60 to 65 minutes

Appliance : Convection oven


Ingredients

Spring-form baking pan – 21 cm

Parchment paper

Pears – 3 small  size, peeled deseeded & halved 

Butter – 150 g, soft at room temperature

Caster Sugar – 100 g / 1/4 cup

Eggs – 3, large

Lemon zest – 1

Vanilla essence – 1/2 tsp

All-purpose flour / Top flour – 150 g

Baking powder – 1 tsp

Pinch of salt


Directions

1. Grease the spring pan with butter and line the base with parchment paper. Grease again with some butter and set aside. Prepare the ingredients.

2. Using a hand held mixer, beat the butter and sugar together until creamy with the speed set at 1. The butter must be soft to get a smooth texture.

Butter and sugar mixed to form a creamy batter | Pear Cake

3. Mix the eggs one at a time starting from a lower speed and increase the speed after adding all the eggs for 2-4 minutes.

addition of eggs into butter-sugar mixture | Pear Cake

Add lemon zest and vanilla. Mix together.

Meantime: Preheat Oven at 170 degrees Celsius.

4. Using a separate bowl add flour, baking powder and salt. Mix with a spoon.

5. Add the flour mixture (step 4) to the egg mixture (step 3) part by part. Mix with the lowest speed until well combined. Make sure not to over beat.

Flour with baking powder and salt into the Egg mixture | Pear Cake

6. Transfer half of the batter to the greased spring-form pan. Spread it evenly.

Pear cake Recipe | Easy fall recipes

Arrange the pears on top of the batter. Pour the rest of the batter and spread it gently with a spatula.

Pear batter

7. Place the baking pan on a low rack in the oven. Set the baking time for 170 degrees Celsius and time it for 60 minutes.

After the baking is done the oven beeps. Let the cake sit in the oven for 5 minutes. Remove the pan from the oven and let it sit to cool.

Pear cake - Fall recipes

Pear Cake

Pear Cake - tart


For more Dessert or Cake Recipes click below 👇👇

NO BAKE:

Caramel Orange Pudding

Vermicelli Pudding or Kheer

Jelly and Custard Recipe


BAKE using Convection oven:

Lemon Cake

Butter Biscuits

Pineapple, Honey and Pistachio Flapjacks

Moist Cassava Cake (or Tapioca Cake)

Read More

Oven-Roasted Spiced Chicken Thighs

Chicken thighs marinated with few blended spices makes it a fantastic easy recipe for an incredible flavor of thirty-minute meals. Roasting in the oven makes it effortless to spend less time in the kitchen during busy hours.


Preparation time: 5 minutes (excluding marination)

Cooking time: 30 minutes

Ingredients

Olive oil 

Skinless chicken thighs – 3

Coriander leaves – 2 stems

Red dry chili – 1

Coriander seeds – 1/2 tsp

Cumin seeds – 1/2 tsp

Ginger-Garlic paste – 1 tsp

Salt – 1/2 tbsp

Dry Oregano – 1/2 tsp

Yogurt – 2 tbsp

Carrot – 1 large, cut diagonally into 2-inch chunks


Directions

1. Into a blender add the coriander leaves, red dry chili, coriander seeds, cumin with some water and make a paste. You can also use a pestle and mortar and pound to a paste.

Add the paste to chicken pieces.

Marinated spices for chicken | Hungry?! That's what I made!

2. Additionally, add ginger-garlic paste, oregano, salt and yogurt. Coat the mixture.

Marination for chicken | Hungry?! That's what I made!

Yoghurt for marination | Chicken oven roast recipe

Cover loosely and leave in the refrigerator to marinate for 3 – 4 hours or overnight.

3. In a roasting dish sprinkle some olive oil. Place the carrots. Remove the chicken and arrange them over the carrots. Pour the rest of the marination sauce over the pieces of chicken.

Chicken thighs | Ready to oven roast

Cover with an Al- foil.

4. Bake in a preheated oven for 25 – 30 minutes at 200 degrees.

Oven-Roasted chicken | Hungry?! That's what I made!

The above picture was taken in the dark, hence the color difference in picture 📸 🙂

Oven-Roast Chicken Thighs | Spiced | Delicious Sweet Aroma

Serve with leafy vegetables 🥗 or a bowl of rice 🍚.

Roast Chicken Thighs | Easy Chicken Recipe | Hungry?! That's what I made!

Some pieces of left-over chicken I used the following day and managed to take a clear shot in broad daylight 😅 yay!


Related chicken thigh recipe:

Baked and Spiced Chicken Thighs


Stay Healthy!


Read More

Spicy Clam Recipe – Mangalorean Style

Every time I see Clams, it reminds me of one my childhood memories of Mangalore visiting the beach during summer foraging for clams. When the tide rises the live clams that burrow in the sand come out and we dig in to catch them before they rebury themselves as they follow the waves. That day we caught large ones so pretty with beautiful designs on them I wished I could return them back to the sea. Those days are truly treasured!

Mangalore, famous for its seafood, is known for variety of local seafood delicacies. This recipe of spicy clams is also known as Kube Sukkhe (Clam dry) in konkani prepared with a common spice mix powder bafat which I always use in other recipes.

Preparation time: 5 minutes excluding cleaning time

Cooking time: 20 minutes

Serves: 3

Ingredients

Fresh live clams – 1 kg

Olive oil – 2 tbsp

Mustard seeds – 1 tsp

Garlic cloves – 3, finely chopped

Onion (medium) – 1, thinly diced

Bafat powder / Fish powder – 3/4 tbsp

Tamarind – 3 seeds or 1 tsp paste

 pinch of salt

Grated coconut –  1/4 cup 


Directions

> How to clean Clams ?

+ If you buy fresh clams, place them in a large pot with cold water (tap water). The water must be a few inches above the top of the clams.

+ In a while you will notice them opening slightly or moving. Dipping them in water allows them to remove any sand or dirt within the shells.

Live clams | Fresh clams

+ Allow to sit for an hour. Then drain and rinse. Fill with a fresh batch of water. Soak for couple of minutes say 15 minutes. This will allow to get rid of any more particles of grit and sand.

+ Drain and rinse of any dirt. Set aside.

+ If you notice any cracked or damaged shells throw them in the garbage.

+ Observe each shell carefully. Any clam with open shells tap them with your fingers gently. If they do not close, they are likely to be dead so throw them out.

Clams that are not suitable to eat | How to


1. Heat a large pot with olive oil on medium heat and add mustard seeds. Once they sputter add chopped garlic and onions. Fry them for a couple of seconds.

Ingredients for Clam recipe

2. Add bafat or any seafood powder. Toss in grated coconut and tamarind water or paste with a pinch of salt. Stir-fry for 3-4 minutes. Do not add any water or any more salt.

Clam ingredients | Easy recipe

3. Now, add the clams. Do not mix when the clams are closed. Cover and cook on medium for 5 minutes.

Cooking Shells | How to cook Clams

4. After 5 minutes if you notice they all have opened.

How to cook Clams | Easy cooking | Hungry?! That's what I made!

Mix to combine with the spice mixture. Turn off heat after a minute.

Spicy Clam Recipe | Easy | Mangalorean Style

Clam Recipe | South-Indian | Delicious Sweet Aroma


For more recipes on seafood click on the recipe below:

Flower Crab Recipe

Sweet Chilli Prawns

Black Pomfret Curry (Facebook link w/o pics)

Prawns with coconut milk

Coconut Shrimp Fry

If you have subscribed to my posts please follow my Facebook page>> Delicious Sweet Aroma << for any future updates on this site. Thank you for visiting!


Stay Healthy!


Read More

Pan-Fried Zucchini

I’m trying creative ways to make my vegetarian dishes pleasing and delicious after realizing that meat is what we cannot live without. And, we are missing out couple of servings containing vegetables and greens🌿 in out diet so this recipe was easy to prepare as a substitute of meat.

I always stir-fried zucchini by seasoning it with pepper in a simple way to reduce cooking time for a couple of minutes. Then, I got bored with it, so I found a new way of adding some flour to grated zucchini with spices and shallow frying it. Just a few ingredients in less than 20 minutes. There you go! Probably, next time I’ll try using the oven to test on the texture and crispness👍.

Preparation time: 7 Minutes

Cooking time: 10 – 15 minutes

Makes: 15

Ingredients

Vegetable oil for shallow frying

All-purpose flour – 90 g

Corn flour – 40 g / 1 1/2 cup

Pepper powder – 1 tsp

Chili powder – 1 tsp

Paprika powder – 1 tsp

Ginger-Garlic paste – 1 tbsp

Grated zucchini – 175 g

Salt


Directions

1. Mix together all-purpose flour, corn flour, pepper, chili, paprika powder, ginger-garlic paste. Add zucchini and some salt. Mix  well without adding any water.

Zucchini tends to release water as you mix. It will be very sticky so if possible try mixing using your hands.

Ingredients for Zucchini Recipe | Easy Vegetarian side | Delicious Sweet Aroma

2. Heat some oil in a pan on medium-high. Drop some amount of the batter  using a spoon.

3. Flip side after 2 minutes. Shallow fry for couple of minutes until it turns lightly brown or crisp and non-sticky.

Shallow frying Zucchini | Veg recipe | Delicious Sweet Aroma

4. Strain them on kitchen paper towels. Serve hot as sides or snack.

Zucchini | Pan fried Vegan, Vegetarian sides| Hungry?! That's what I made!

Pan-fried Zucchini | Vegan | Vegetarian sides


Related Vegetarian Recipes:

Raw Jackfruit Dry in Clay Pot

Mushroom Soup 🍄

Curry of Drumsticks

Pan-Fried Breadfruit Recipe


Please do not forget to check my FB page >> Delicious Sweet Aroma<< On updates related to this site. Like or comment on the above to make sure you do not miss my posts and recipes.

Hope to see you again! Until then 👋👋👋 lots of love ❤

✍Sherryl


Stay Healthy!

Read More

Vermicelli Pudding or Kheer


Kheer or Vermicelli Pudding is a term used for milk pudding. In some region of India they call it payasam.

This simple recipe of Vermicelli Pudding is prepared mainly with Vermicelli. It uses a handful of other ingredients for a lighter dessert. You can also replace vermicelli with rice, sago, tapioca pearls etc. For flavor, cardamom (MUST!), cashews, raisins, almonds etc are used. Sometimes some recipes use condensed milk for a rich flavor. I prefer desserts with minimal sugar. They offer mild sweetness and are best suited after a heavy meal.

The process of slow cooking milk along with the vermicelli gives it a thick texture. It comes out fabulous in 15 minutes.


Preparation time: 2 minutes

Cooking time: 15 minutes

Serves: 4


Ingredients

Milk (Pasteurized) – 2 1/2 cups

Wheat Vermicelli plain – 1/2 cup (*see notes)

Vermicelli plain pack | RiceKheer recipe| Delicious Sweet Aroma

Granulated Sugar – 4 tbsp, (less sweet) depending on sweetness

Cardamom – 1, powdered or whole seeds

Cloves – 2 (optional)

pinch of salt


Directions

1. Take a deep-bottomed container with milk (if its not boiled then get it to a boil) on medium heat. Add vermicelli, cardamom, cloves if using, sugar and salt.

Vermicelli plain | Kheer or Vermicelli pudding recipe

Kheer Ingredients | Easy | Delicious Sweet Aroma

2. Using a wooden spoon give it an occasional stir so the milk does not stick to the bottom. As it thickens keep stirring. This takes up-to 15 minutes or less. Turn off heat and remove from stove top.

Vermicelli Kheer or pudding | Easy dessert | Delicious Sweet Aroma

If it becomes too thick add more milk at the end depending on how much thick you love to have.

3. Serve hot. You can drink it or have it like a dessert.

Kheer or Vermicelli pudding | Easy dessert in 15-minutes

Once cooled, store it in the fridge covered.


Cook’s tip:

Heat it and serve. You can store it for 3 days in the fridge.


Notes:

*Feel free to add your choice of nuts like raisins, cashews, or others. I skipped them this time as they were out of stock, but it still turned out delicious!

*If you can’t find this one, you can also opt for rice vermicelli as a substitute. I prefer the non-roasted one as I like it white and not brown.


More dessert recipes click below 👇:

Caramel Orange Pudding

Layered Jelly & Custard Dessert


Stay Healthy! ☺

Read More